Using Label Printers
- Using Label Printers
SHARK has a system for printing barcode labels in various contexts. The system does not format the label using a Windows driver, but requires the label to be formatted in the native language of the used printer. Using the native language make the printing faster, more stable and provides better print results. Thus there is no need to install a Windows driver for the printer. An exception to this is if the printer is accessed using a Windows Share, in this case a simple text printer must be installed.
To print a label, the following must be configured:
- A label printer must be available, connected directly to the PC from where the print is done, or a printer connected to the local network.
- The printer must be defined in SHARK.
- A layout must be defined for the printer. This defines how the label will look like and which commands that must be send to the label printer.
- A mapping between the layout and the context where the layout should be used.
- For automatic printing, some configuration may also be required for the specific function where the label is needed. It is for example possible to print a picking label for each picked order line, this requires a configuration of the “Floating Batch Pick” window.
The defined templates can be reused between all PCs. Printer setup and configuration of how each context is printed, must be defined for each printer and PC.
The standard labels that follows the system and the documentation are based on the Zebra printer language “ZPL”. ZPL is widely used and also supported by other brands. Other printer languages may be used, but is not covered by this documentation.
A printer named ‘PrinterDefault’ is configured as default which also maps all contexts to their template counterpart.
A built-in preview printer is available for test purposes. It will pop-up a window showing the label in a window. It only works for ZPL formatted labels.
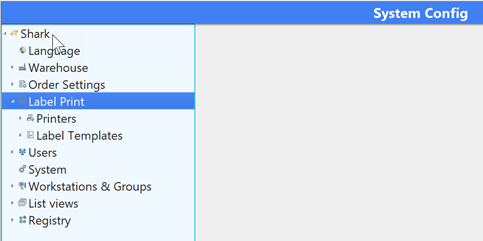
Navigation
Menu: Administration > System Configuration > Label Print
Adding a Printer
To create a new printer, right-click Printers and select add printers.

Then fill in all information about the printer.
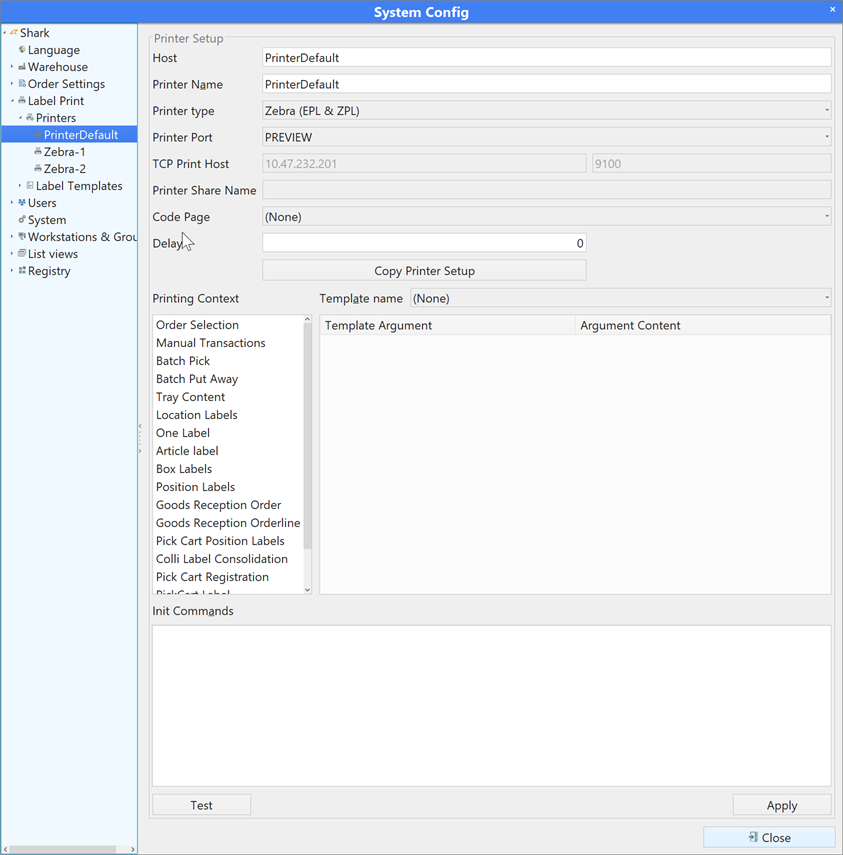
Host: This parameter is used for printing from the PDAs, where the software is running in a web browser. The PDA cannot print directly and this is handled by a PC or server and the name of that PC is the “Host”.
Printer Name: Name of the printer identifying the printer. The name must be unique within the host.
Printer type: Choose which type of printer used. This controls how printer commands are sent to the printer and also ensure that only templates defined for that printer type are presented for use in the relevant contexts.
Printer Port: Select the printer port on the PC printer.
The following port types can be chosen:TCP, SHARE, DOCUMENT & PREVIEW
TCP or SHARE requires the fields explained below to be set.
PREVIEW can be sued for af WYSIWIG view aof the label if you are experimenting with a layout.
TCP Print Host: IP address or name and port, for TCP/IP printers connected to the network. Use 9100 as default port number.
Printer share name: Define the SHARK Name if Printer Port is set to «Share». It requires a share to be defined for the printer and a windows printer driver to be used. Normally the ‘Generic Text’ printer driver should be used. This is the only way to connect for example USB based printers.
Code Page: Defines the mapping of the UniCode characters in SHARK to the printer format. Is country specific characters printed with wrong codes (like «ÆØÅ»), this is typical the codepage that is wrong.
Delay: Delay between each label that is printed. If no flow control is used, there is a risk that printer buffer runs full during long printouts. If that is an issue, a delay in milliseconds can be defined between each printed label. Set the delay so the printer has enough time print before the next label is sent.
Copy Printer Setup Can be used to copy the settings from another already defined printer.
Printing Context: can be used to select which label template should be used in any given printing context. For each context you can define which context dependend argument can be printed. First you select the context and then you select the ‘Template name’ to be used. Finally yo set the arguments.
Init Commands: It is possible to set some special printer commands, that are sent the first time the printer is used. This can, for example be setup type, label size, etc. Leave the box blank if not used and do NOT use it for testing label templates if you do not remove the commands again. It should only be used for initialisation commands.
[Test]: Print this button to send the Init Commands.
Label Templates
This defines a standard template for a label. What the template should look like, depends entirely on the printer used and requires documentation for the actual printer. Third-part software can also be used to define the label template.
In the template with printer commands, placeholders are used to define where the final text to print should be put. Use %1, %2, %3, etc. to print parameter 1,2,3. To define the maximum length of the inserted text, use the format: %<number>L<length> to set the maximum field length. Append a “U” to the placeholder, for example %1U to force the inserted text to be in upper case characters.
The system already contains templates for all contexts in the ZPL-II printer language.
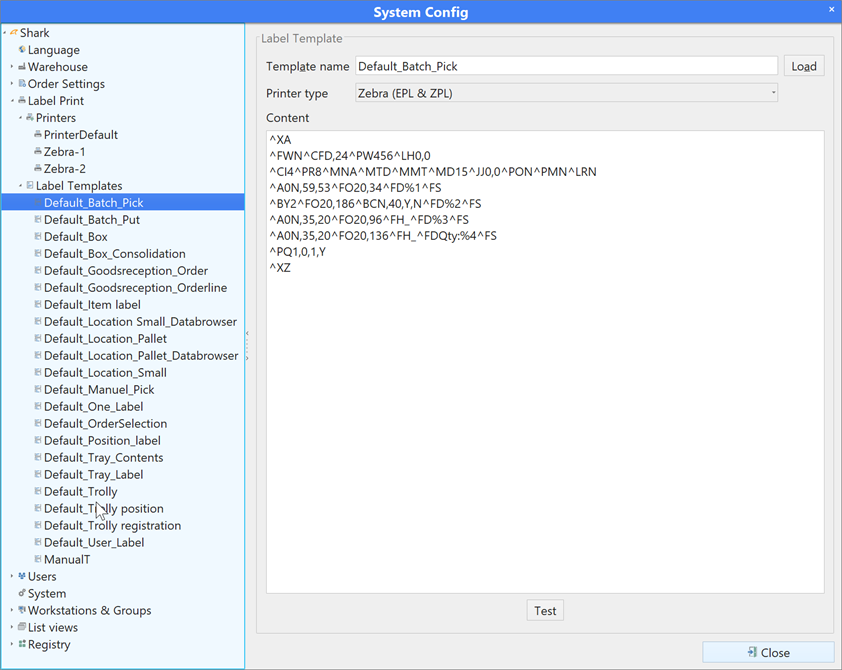
Template Name: Name of the template.
Printer Type: Select which type of printer used. Must be equal to the created printer.
Content: The actual commands sent to the printer.
[Test]: When you press the [Test] button, sent the custom commands in content to the printer. This is a quick way to check the created layout. Instead of the final text, it will print %1,%2, etc. where the text will eventually be inserted.
Multiple Printers in 1 Automat Zones
When batch picking labels are used for each pick, it is convenient to have more than one printer in an automat zone to avoid the possible long distance to the label printer. Typical 1 printer is used for 2 automats, but it is also possibly to have one printer for each automat. To configure this, do the following:
- Add all printers to each PC in the zone, where the name of the printer is the same as the Automat</span>. For example, if the one automat is named “A1” (as seen in the location address), the printer should be named “A1”.
- Set the configuration flag MultiplePrinters=true for the Floating Batch Window (in the SHARK registry).
Workstation printer setup
On each workstation you can define one or more printers to be used in any given context. If a context is selected in the ‘Printer Setup’ dropdown all contexts will be using that printer. If ‘(None)’ is chosen you’’ be able to choose any defined printer for every context.

Label Printing Contexts
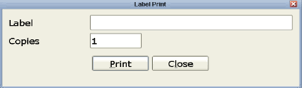
Simple Label
Print a simple, random label. Only one parameter can be stated.
The function can be used e.g. for printing of control labels used for initiating picks, printing label, etc.
Note that there must be a label template defined for this label type and a label printer connected for this function to work.
Navigation
Keyboard: CTL+L
Menu: Transactions -> Print Label
Functionality
-
Type the desired text.
-
Type the desired number of copies.
-
Press [Print].
-
Continue with more labels or press [Close] when you have finished printing.
Print an Article Label
Print a label for a specific article number.
Note that there must be a label template defined and a label printer connected for this function to work.
Navigation
Keyboard: CTL+T
Menu: Transactions -> Print Item
Functionality
-
Type Item Number.
-
Type the desired number of copies.
-
Press [Print].
-
Continue with more labels or press [Close] when you have finished printing.

Location Labels
Function for printing location labels for a selected area of the warehouse, for example a module, aisle, tray or for the whole warehouse. It is not possible to print a single labels. The purpose is to mark up the locations with labels before use.
Navigation
Menu: Administration > Print Locations
Keyboard: There is no short-cut for this function
Printing Labels
Either select to “Print All” or define what to print.
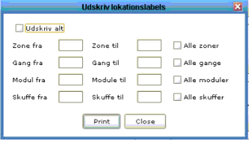
[Print All]: Print a label for each location in the warehouse (this can be a lot labels!).
Zone from, to: Specify which zones to print. Enter for example “A” “A” to print from Zone A.
[All Zones]: Print all existing zones
Aisle from, to: Specify the range of aisles that should be printed (both included).
[All Aisles]: Select this to print all aisles.
Module from, to: Specify the range of modules that should be printed (both included).
[All modules]: Select this to print all modules.
Trays from, to: Specify the range of trays that should be printed (both included).
[All Trays]: Select this to print all trays in the specified zones and aisles.
[Print]: Start printing.
[Close]: Close the window.
Special Barcode Labels
Used for printer various labels for boxes, locations, pick carts, etc. Barcodes used in SHARK contains a hidden code that allows SHARK to recognize the label type. if a barcode is scanned on for example a pick cart, SHARK knows this is a pick cart and can react appropriate without opening a special menu.
To print the special labels, a template must be defined and a label printer must be available.
The following label types can be printed:
- Box labels.
- Position labels.
- Pick Cart labels.
- Pick Cart Position labels
- Sort Position labels.
- Tray Labels.
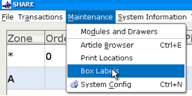
Navigation
Menu: Administration > BoxLabels
Keyboard: No short-cut available for this function.
Printing Labels

Label type: Choose which label type to print.
Postfix: En fix text that will put in the front of the label.
Range: Choose the internal of labels to print. For example write 1 and 5 to print labels with number 1,2,3,4,5.
Digits: Choose how many digitis in the number. If there are more digits than the length of the number, «0» vil be inserted.
Postfix: A fixed text to put after the number.
Copies: Number of labels to print, default is «1».
Example: Printing Position Labels
Position labels are used as temporary locations for boxes containing orders. To make 10 position labelsname P-01 > P-10 enter the following:
Label Type: Position Labels
Prefix: P-
Range: 1 and 10, mark «leading zeroes».
Digits: 2
Postfix: empty
Copies: 1
Printing from PDAs for SHARK Cloud
PDAs cannot print directly to a printer and for cloud installations, the server has no access to the internal network where the printers are. To circumvent that problem, the SHARK Cloud Server send printing events to a PC client that are on the same network as the printers. The PC client then redirects those printer events to the local printer.
How the label is printed
Configuration
1. Setup a local printer
Setup a local printer the usual way.
The Host field is filled with the name of the PC from where the label will be printed. This is also from here, the layout and context mapping are defined.
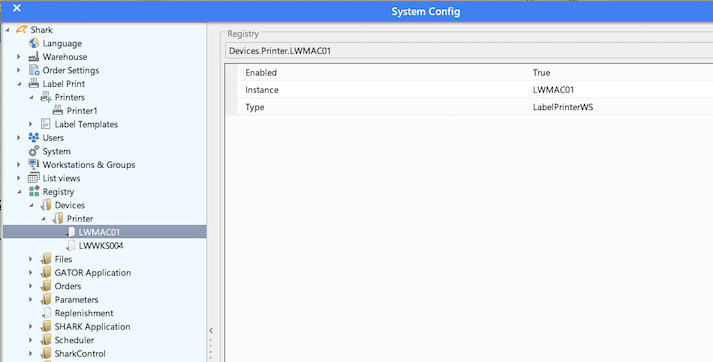
2. Configuration of the Printer Server
On the PC from where the label is printed, a printer module must be running. This is a SHARK Control module with the following module running:
- Type: LabelPrinterWS.
- Enabled: true
- Instance: Name of the pc from where the printing will be done (must be a local PC). If the printer module is running as a service, set the Instance name to “Server”.
Configuration of the driver for the label printers.
3. Select the printer in the PDA application
To print from the PDA application, is like any other printer, just select which printer to use.
Preview
There is a Printer Port called Preview. This is a optional feature to preview ZPL formatted labels in a window, without actually printing anything. It make use of an external web service (http://labelary.com) and can be used to preview how the label actually will look like. It will not always make fully correct results and there is no guarantee of availability.
The used Barcode Format
The system makes use of special formatted barcodes that allows the software to recognize the function of the code. The general format of these barcodes is:
-+#<2 digit type code><value>
A picking box has for example the type “02” and a box with number 0765 will have the following barcode: -+#020765
The barcode must always be followed by an <enter> character.
The scanner must be configured so it is able to scan the special codes (-+#) correctly in case these barcodes are used.
To check if a scanner is configured correctly, try to scan a barcode in for example Notepad and check if the characters are correct and that the barcode is followed by a newline character.
| Type | Code | Comments |
|---|---|---|
| Location | 01 | BARCODE_LOCATION |
| Picking Box | 02 | BARCODE_BOX |
| Flow rack position | 03 | BARCODE_BOX_POSITION |
| Pick Cart | 04 | BARCODE_PICK_CART_NUMBER |
| Position Pick Cart | 05 | BARCODE_PICK_CART_BOX_POSITION |
| Reserved | 06 | BARCODE_TRAY_NUMBER |
| Reserved | 07 | BARCODE_ARTICLE_NUMBER |
| Sorter Position | 13 | BARCODE_SORT_POSITION |
| Command | 14 | BARCODE_COMMAND |
Note that most scanners actually send the key pressed code and not the actually character. This means that the barcode scanner must be configured for the keyboard layout and language.
The barcode prefix can actually be changed to something else. Look in the registry under “SHARK Application > Defaults”.