Driver for the Logimat HLL
- Introduction
- Configuration
- Connection the PC to the Logimat
- Configuration of the Omron PC (obsolete)
- IHO
- Location Light
- Lift
- Tilt
- LogiStub
- Multiple Openings
- External Control of the Logimat
- Command Interface
- Simulation Mode
Driver for Logimat HLL
Introduction
The Logimat HLL Control module is a collection of several individual drivers, used for different versions of the Logimat controlled by the Omrom PLC. During the years, there have been a number of different versions with different PLC firmware.
| Shark Control Type | Logimat Version | Notes |
|---|---|---|
| LogimatOmron | Year: 1999-2004. | First Handler A/S version with the Omron PLC (1999-2004). Interface: Serial or Ethernet by Moxabox. |
LogimatOmronSimple |
Year: 1999-2004. | Special version of with the first Logimat version with a simplicifed interface with a minimum interaction with the PLC. Used for PLC firmware/versions with "strange behavioir". |
| LogimatOmron2 | Year: 2004-2013. |
|
| LogimatOmron3 | Year: 2012-2013. | Special version with support for IHO Interface: Serial or Ethernet by Moxabox. |
| LogimatOmron4 | Year: 2013-2014. | Special version supporting multiple openings. Interface: Serial or Ethernet by Moxabox. |
| LogimatOmron5 | From year 2012Q2 and later with firmware 55.2 |
The LogimatOmron5 Shark Control Module is designed for the controlling the Logimat from year 2012Q2 and later with firmware 55.2 or newer with the Omron PLC. This is the version after SSI took over the Logimat. It supports advanced features like:
|
| LogimatOmron6 | Update Logimats. | Used for older Logimats, with replaced Omron PLC because the original PLC now is obsolete. Interface: Ethernet UDP. |
What features actually are available, depends on the licence key used to activate Shark.
Configuration
The configuration of the module is done in the Shark Registry under:
*devices.verticallifts.<module name> Import parameters *
Registry Parameter |
Values |
Description |
|---|---|---|
Type |
LogimatOmron5 |
This defines the Logimat type. AutomatSimulateIHO can be used for simulation. |
IHO_Supported |
true|false |
Set to true if the Logimat is equipped with IHO functionality. |
Connection |
MoxaGateway:ip:port / COM1 / COM2 |
Example: use a Moxabox: MoxaGateway:10.1.1.1:4001 |
IHO_Locked |
true|false |
IHO is supported, but all tray positions are locked. |
PositionSpacing |
25 |
Distance between each position. Default is 25mm. |
AutoAcceptTrayHeightChanges |
true|false |
If set to true, changes in goods height will be accepted automatically. Default is false. |
DefaultTrayHeight |
100 |
Height of the empty tray. Default is 100 mm |
TrayClearance |
25 |
The is the minimum security distance between trays. It includes bending and measurement tolerances. |
TrayConfigBackupFile |
Filename |
Shark makes a backup file containing the current PLC tray configuration. This is the name of the file. Default is trayconfig-backup.txt |
SuppressErrorEvents |
true|false |
If true most error events will be suppressed. This will prevent error menus to be displayed in Shark. Indented to be used in setups where Shark is controlled by an external Host via the Web Service. Default is false. |
AdjustLiftToTrayHeightLimit |
0.3 |
This is a function that can be used if the variable lift is available. If the tray height is heigher that this parameter, the lift will be lowered to compensate for the height. It will slow down the operation speed because the Logimat will stop while the lift is adjusted. |
StartUpDelayMS |
0 |
This value will force a wait before accessing the PLC. The delay is in ms. |
CacheLifeTimeMS |
100 |
To optimize PLC communication speed, data is read in blocks and cached in PC memory. This is the maximum allowed age of data in ms before they are refreshed. |
CheckPLCAutomaticMode |
true|false |
Check if the PLC is in remote-control mode. |
Debug |
true|false |
Enables extended logging to the database. |
DefaultStatusPollDelayMS |
15000 |
Time in ms between status is read when the Logimat is idle. |
DemoModeDelay |
10 |
Time the tray will stay at the opening when in demo mode. |
DemoModeEnabled |
true|false |
Mode for automatic run-mode. |
IgnoreErrors |
true|false |
Special mode to ignore errors from the PLC. Used to force the Logimat to operate, in case of a none important sustained error. |
LogTrayMoveToDB |
true|false |
Logs to the database when the tray is requested, arrives at opening, returned and at returned position. Also calculate and updates ETA for the tray, used to optimize the picking sequence. |
MaxIdlePolls |
5 |
If NoIdlePoll=True this is the maximum number of polls. |
NoIdlePoll |
true|false |
If true polling of Logimat status will stop when the machine is idle. Minimizes bus load (shared PLC bus) or avoid unnecessary network trafic. |
PackMode |
Manually |
Packing strategi for IHO. Only Manually is supported. |
ResetOrderStack |
true|false |
If true the PLC order stack will be reset for every tray request. |
Connection the PC to the Logimat
Moxa Box
For interfacing to serial devices (RS232/RS422/RS485), it is preferred to use an Ethernet gateway to enable the device to be connected directly to the network. Compared to a direct connection, it has a number of advantages:
- No PC/Server with serial ports is required.
- No physical limits of cable length.
- No electrical problems with earthing, etc. of sensitive signals.
SHARK uses typical a Moxa NPort gateway. The NPort module is running in “TCP Server Mode”. Other gateways can be used as well, for example Lantronix, but is not directly supported by Shark.
There is no software driver installed on the PC. SHARK communicates directly to the Moxa box by Ethernet.
The automats must be connected together in a PLC network.
-
The bus must be terminated at each end of the cable, this is done by setting the Omrom “CIF” module to “on” at the first and the last automat in the “chain”. Only CIF modules must be set to “on”.
-
The signal ground wire must be connected as well.
The Logimat PLC must be configured for the correct communication speed, “switch 4” on the PLC must be set to “on”, else the communication will not work. (see picture below).
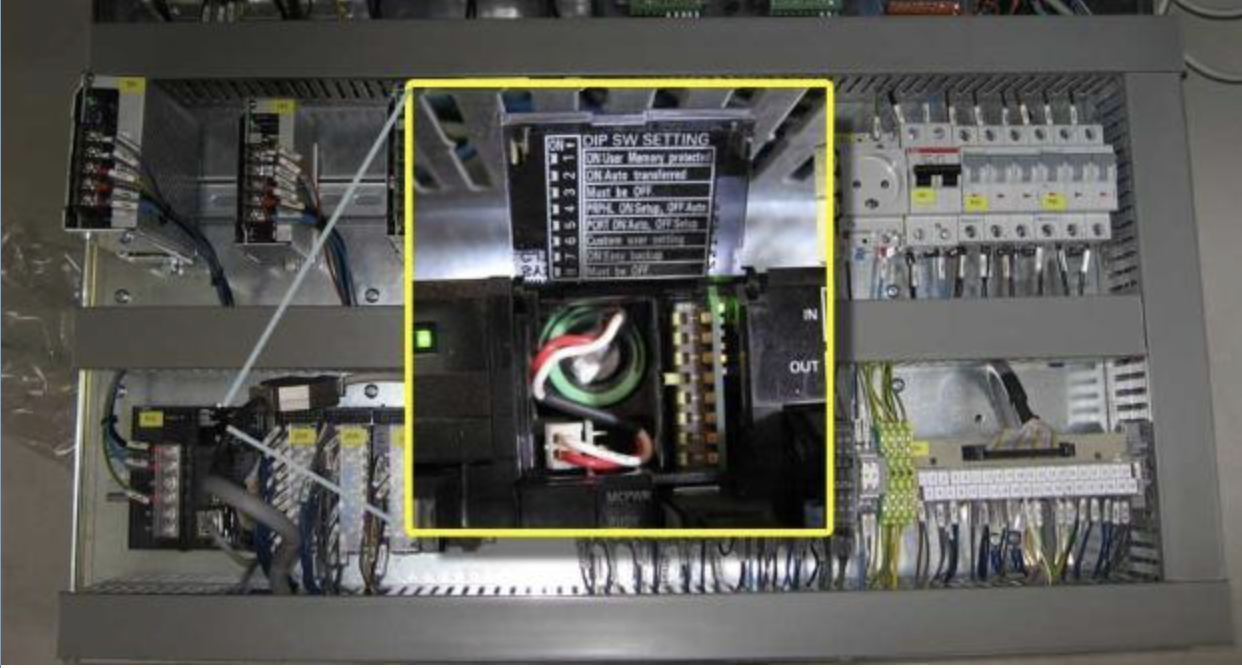 The PLC switch that must be set to make the communication work
Connecting a NPort Moxa bus to the PLC Bus
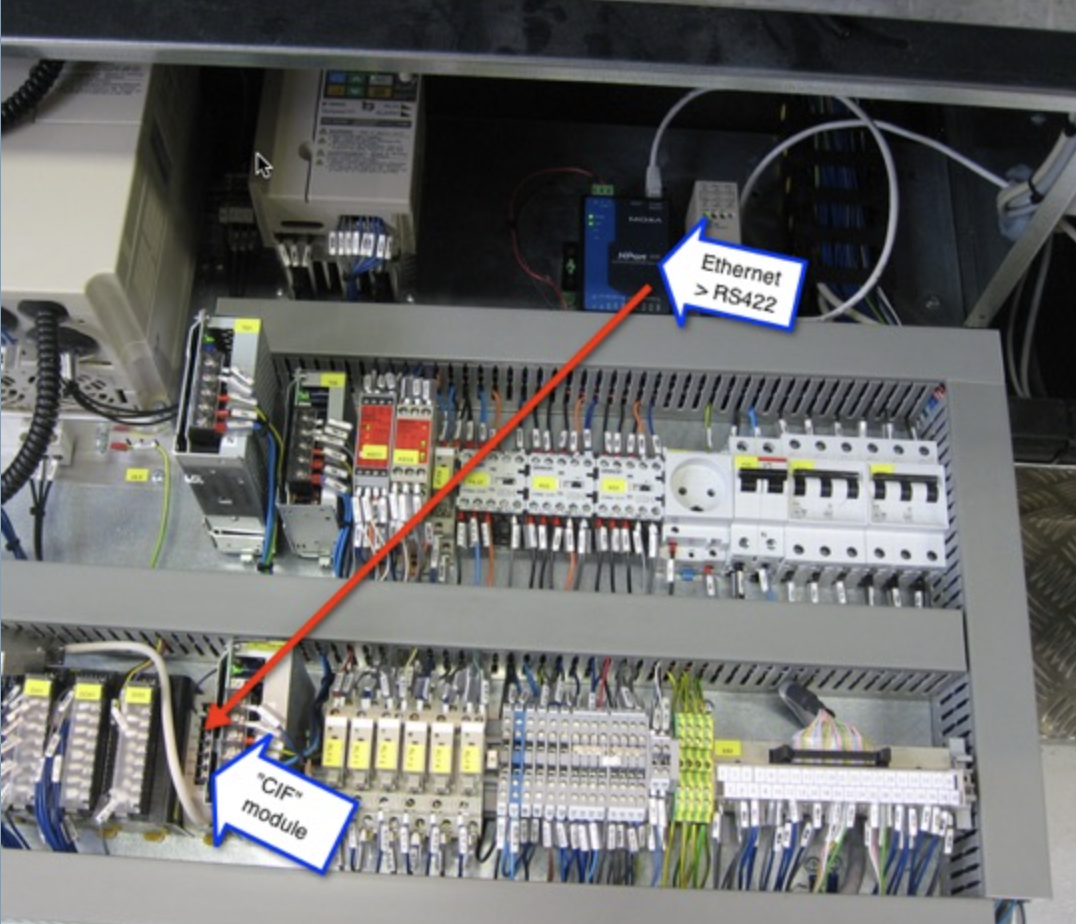 There a different PLC versions. This picture shows one possible configuration, where the PLC is located below the opening on the floor
The connections from the PLC bus to the Moxa box are:
| Logimat Wire | Moxa NPort |
|---|---|
| White | RS422 - T+ |
| Green | RS422 - T- |
| Brown | RS422 - R+ |
| Yellow | RS422 - R- |
| SG | GND |
The Moxa box gets power from the PLC 24V supply.
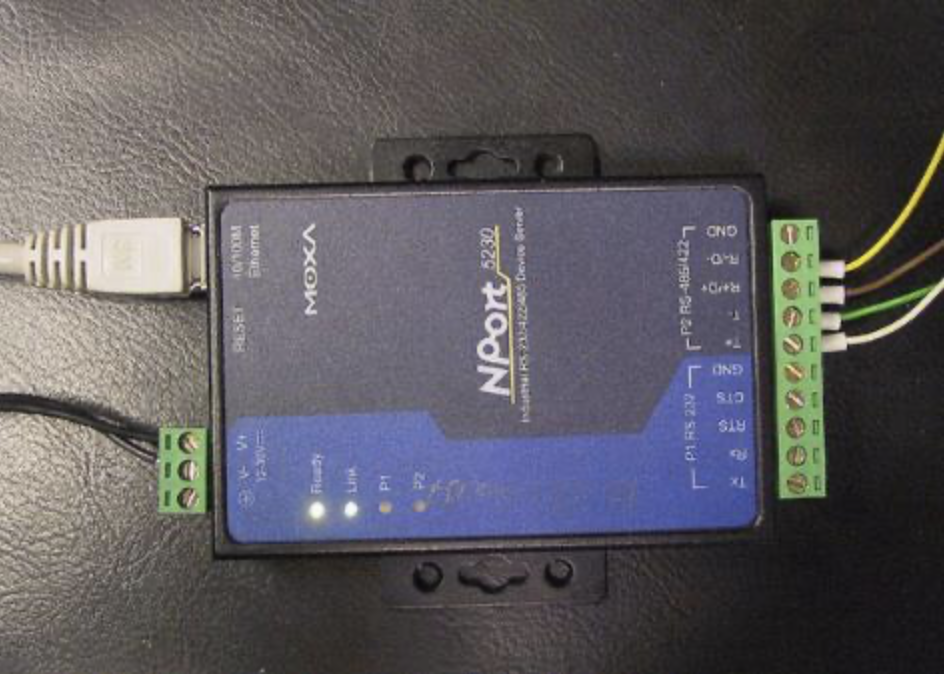
Configuration of the Moxa Box
Before installation decide if the module should use a fixed IP address or a dynamic. In case a fixed IP address is preferred, one must be given by a network administrator.
The module has a fixed IP address when delivered that is 192.168.127.254. To setup the module configure a computer to work in the 192.168.127.XXX segment (for example by setting the computer to a fixed IP address in that range).
When the module is connected to the network and the computer used for configuration is ready open from the computer the web configuration tool in the module (http://192.168.127.254).
In basic settings, set a name for the module, for example MOXA1, this name must be unique if more than one module exists in the same network. Press “Submit” (this will restart the module).
Open the web configurator again at http://192.168.127.254. Now select “Network Settings” .
For dynamic IP address:
- Set the “IP Configuration to “DHCP”. Press Submit to save and restart the module.
For a fixed IP address:
- Set the “IP Configuration” to “Static” and set the IP address/Netmask to the one given.
- Now is the network access configured.
- Try to find the module by “ping MOXA1” or what ever the module is called.
- The serial settings can now be set using the web configuration by for example http://moxa_1.
- The automats are connected to the Moxa Port 2, only this port supports RS422.
General setup for Port 2
| Operating Settings | |
|---|---|
| Operation Mode | TCP Server Mode |
| TCP Alive check time | 3 minuts |
| Max Connections | 4 |
| Local TCP port | 4002 |
| Force transmit | 50ms |
| Serial Settings | |
|---|---|
| Baudrate | 9600 |
| Data bits | 7 |
| Stop bits | 2 |
| Parity | Even |
| Flow control | None |
| FIFO | Enabled |
Configuration of the Omron PC (obsolete)
Some Logimats has a built-in PC where Shark is installed. To install software on the PC, follow the procedure:
- From a command prompt run: ewfmgr c: -disable
- Restart the PC
- Install the software
- From a command prompt run: ewfmgr c: -enable
- Restart the PC
IHO
Intelligent Height Optimization. This is a mode where Shark maintain trays with variable heights.
Tray Heights
This chapter describes the logical model used for the automat. Some general rules:
- Tray numbers are all logical, this means that the tray number used, does not define the physical position of the tray.
- The automat has a number of positions, where the trays are placed. These positions have numbers that are directly related to the physical position.
- On each position a logical tray can be placed.
- A position group is a sequence of positions, with a starting offset (physical distance), a fixed spacing between each position and a top space.
- The trays are grouped in front/back.
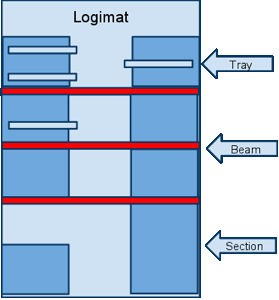
*Model of the Logimat, with positions collected in sections and sections separated by beams or other obstacles. *
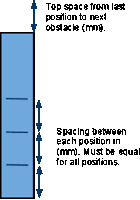
*Definition of óne tray group. *
Location Light
The module supports the built-in pointer in the Logimat (LogiPoint).
The LogiPoint pointer for the Logimat does not require any software calibration, besides that the basic parameters must be set correctly. Although it should not be needed, it is still possible to set some basic calibration parameters.
Before the pointer can be used it must be mechanical calibrated. After initialization of the light, either by restarting Shark Control or from the Logimat it self, the red spot should point at the lower, right corner of the tray. If that is not the case, the Logimat needs maintenance.
It is also important that the light points perpendicular to the tray (90 degrees).
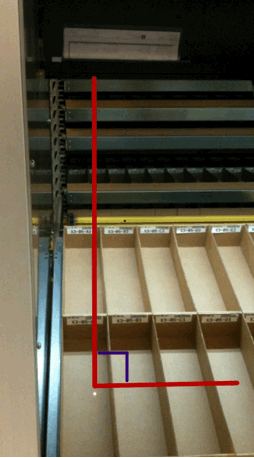
Registry Setup for the LogiPoint.
The calibration parameters for the light pointer is set from the Shark Registry:
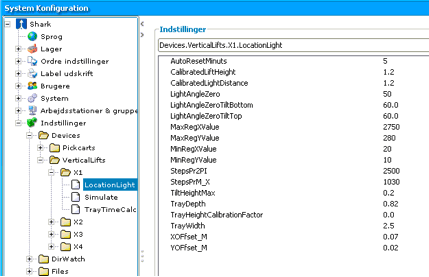
devices.verticallifts.<module name>.LocationLight ..
Registry Entry |
Data type |
Value |
Description |
AutoResetMinuts |
Integer |
5 |
The location light will go to the reset position and thereby auto calibrate, when the pointer has been idle for the specified number of minuts. |
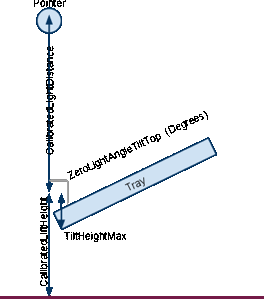
CalibratedLiftHeight |
Float |
1.0 |
Height of lift in meter in the calibrated position. |
CalibratedLightDistance |
Float |
1.0 |
Distance of light in meter from mirror to the bottom of the tray. |
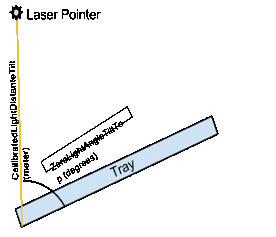
CalibratedLightDistanceTilt |
Float |
1.2 |
Distance of light in meter from mirror to the bottom of the tray when the tray is tilted. |
LiftAngleZero |
Float |
50 |
Angle of the light in degrees between light and the bottom of the tray (see figure). |
LiftAngleZeroTiltTop |
Float |
60.0 |
Angle when the lift is a top position (degrees) |
LiftAngleZeroTiltBottom |
Float |
60.0 |
Not used |
MaxRegXValue |
Integer |
4000 |
Maximum number written to the x position register. This can be used to limit the range of the pointer. |
MaxRegYValue |
Integer |
400 |
Maximum number written to the y position register. This can be used to limit the range of the pointer. |
StepsPrM_X |
Integer |
1020 |
Defines how many steps the PLC needs to step 1 meter in the X direction. Default is 1020. |
StepsPrM_Y |
Integer |
4100 |
Defines how many steps the PLC needs to step 1 meter in the Y direction. Default is 4100. |
TrayDepth |
Float |
0.82 |
Depth of tray in meter. For example if the tray dimension is 3000mmx820mm, this value is 0.82. |
TrayWidth |
Float |
3.0 |
Width of tray in meter. |
TrayHeightCalibrationFactor |
Float |
0.0 |
Value between 0 and 1. Deactivated with 0, if 1.0 the pointer will be adjusted to point to the top of the box location. |
XOffset_M |
Float |
0.0 |
Use this value to adjust where the pointer points, when it is a zero position. Normally the light should point to the lower right corner when at zero position, but this can be modified using this parameter. Distance from tray right wall to the spot, measured in meter. |
YOffset_M |
Float |
0.0 |
Use this value to adjust where the pointer points, when it is a zero position. Normally the light should point to the lower right corner when at zero position, but this can be modified using this parameter. Distance from tray front wall to the spot, measured in meter. |
Parameters used when tilt is not enabled:
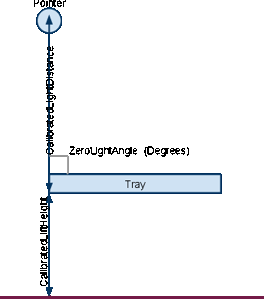
Parameters used when tilt is enabled:
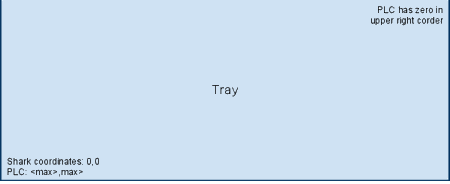
Top View
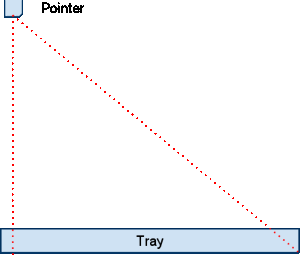
Seen from side
Calibration Procedure
Follow this procedure to calibrate the light pointer.
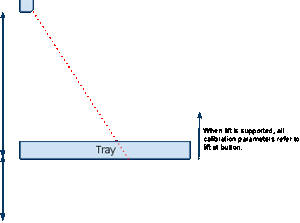
Step 1
First the pointer must be calibrated mechanical, so zero points at the
lower, right corner in the tray.
Shark Control command to reset the pointer: LIGHT:BLANK
If it is not possible to make the mechanical adjustment, use the XOffset_M and YOffset_M parameters to specifiy an offset.
Shark Control commands for online (telnet) changes of the parameters (changes will be lost after restart) :
LIGHT:ConfigStepX StepsPrM_X
LIGHT:ConfigStepY StepsPrM_Y
LIGHT:ConfigZero X,Y
Step 2
If Tilt is supported: Move the lift to the bottom position.
If Lift is supported place the tray at the lowest possible position.
Step 3
If the pointer does not point to the lower right corner of the tray when the pointer is at zero position. Measure the offset from the tray corner to the pointer in mm.
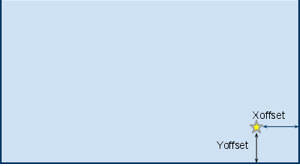
Step 4
Move the pointer to the upper left corner.
Shark Control command: LIGHT:GO 0,1
Measure the distance in mm. and enter the X,Y values as MaxRegXValue and MaxRegYValue.
Step 5
Measure the distance from the pointer to bottom of the tray, enter this
value as CalibratedLightDistance (meter).
Step 6
Measure the dimensions of the tray and enter as TrayWidth (meter) and
TrayDepth (meter).
Step 7
If Lift is supported: measure the height
of the bottom of the tray from the ground and enter as
CalibratedLiftHeight (meter).
If Lift is not supported: Set CalibratedLiftHeight to 0.
Step 8
If Tilt is supported: Tilt the tray and measure the height of the tilt
at the back and enter the value in TiltHeightMax (meter).
If Tilt is not supported: Set TiltHeightMax to 0.
Lift
The two lift systems, used by the Logimat, are both supported:
-
The first solution are 2 or more fixed bearings. Shark will choose the nearest bearing, according to the user requested height.
-
The second solution is where the height is controlled by a variable motor controlled system.
Configuration:
Registry Parameters |
Value |
Description |
LiftType |
0|1|2 |
0: No Lift supported. |
AdjustLiftToTrayHeightLimit |
Height of tray in meter. |
If the tray height is heigher that this parameter, the lift will be lowered to compensate for the height. It will slow down the operation speed because the Logimat will stop while the lift is adjusted. |
To enable the Shark Client set the “Feature” bit 7 to 1 (value 64 if
empty).
To set the lift height for each user.
Tilt
Enable Tilt in Shark pre-2012Q1
To enable the Shark Client set the “Feature” bit 4 to 1 (value 8 if empty). The features are set in System Configuration → System Parameters → Features.
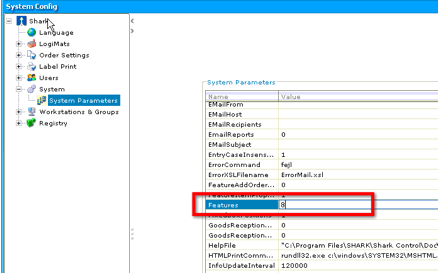
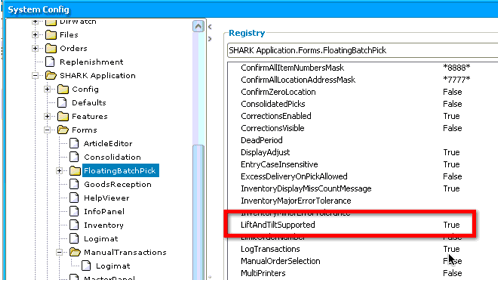
To be used in the the “Floating Batch Pick” window, it must also be enabled for this panel in the registry parameter.
- To be used in Manual Transactions, the registry parameter Registry..forms.Manual Transactions.LiftAndTiltSupported must be true.
- In the registry Devices.VerticalLifts.<automat name>.Tilt must be true.

Enable Tilt in Version 2012Q1 and later
Tilt must first be enabled in:
- In the registry Shark Applications → Forms → FloatingBatchPick, set “LiftAndTiltSupported” true.
- For each Logimat in the registry Devices → VerticalLifts → <name>, set “Tilt” true.
Setting Trays to Tilt
When Tilt is enabled and the client is restarted, a new column is available for the tray configuration. Here Tilt can be enabled/disable for each tray individually.
LogiStub
The LogiStub is supported. To enable the buttons in the Logimat screen, the function must be enabled in the Registry.
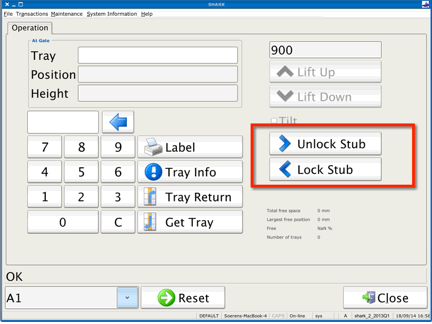
It must be enabled for each Logimat (workstation) supporting this functionality:
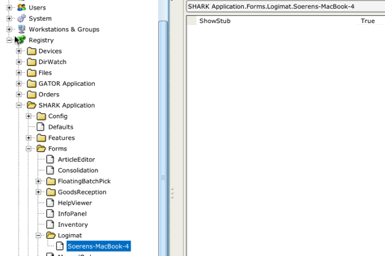
Set Shark Application à Forms à Logimat à <workstation> à ShowStub=true
Multiple Openings
Support for Multiple openings or gates is used when the Logimat is equipped with more picking openings.
There is no special configuration of the Shark Control module, but the client must send the right gate number.
- Each opening must have one PC with Shark installed.
- One of the PC is a master and is connected to the PLC.
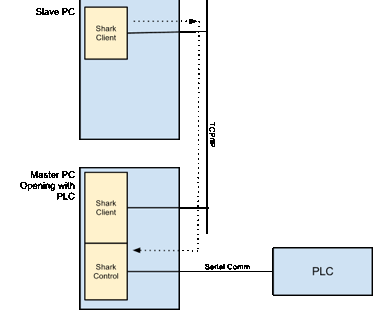
Master PC Configuration
Check list to configure the master PC (SHARK registry entries) :
-
SharkControl.Port=8089
Other port numbers can be used, but 8089 is default. This is the port number that an external PC can access Shark Control.
-
Shark.Application.Config.<MasterPCName>.AutomatGate=1
Tell which opening the Master PC will control.
-
Shark.Application.Config.<MasterPCName>.AutomatGateFrontView=true
Orientation of the opening, true for normal front opening, false if in the back side of the machine.
-
Shark.Application.Config.<MasterPCName>.ControlModules=ModuleID
This is the moduleID from the Module database table for the module (Logimat) that has to be controlled by this PC.
-
Shark.Application.Config.<MasterPCName>.LocationPattern=pattern_to_display
-
Shark.Application.Config.<MasterPCName>.LogimatModuleName=name_of_logimat
-
Shark.Application.Config.<MasterPCName>.SharkControl=Embedded
Tell Shark that this PC should host Shark Control.
-
Shark.Application.Config.<MasterPCName>.SharkControlPort=8089
The port that is used for Shark Control Communication.
Slave PC Configuration
Check list to configure the slave PC(s) (SHARK registry entries) :
-
SharkControl.Port=8089
Other port numbers can be used, but 8089 is default. This is the port number that an external PC can access Shark Control.
-
Shark.Application.Config.<SlavePCName>.AutomatGate=2
Tell which opening the Master PC will control.
-
Shark.Application.Config.<SlavePCName>.AutomatGateFrontView=true
Orientation of the opening, true for normal front opening, false if in the back side of the machine.
-
Shark.Application.Config.<SlavePCName>.ControlModules=ModuleID
This is the moduleID from the Module database table for the module (Logimat) that has to be controlled by this PC.
-
Shark.Application.Config.<SlavePCName>.LocationPattern=name_of_logimat
-
Shark.Application.Config.<SlavePCName>.LogimatModuleName=name_of_logimat
-
Shark.Application.Config.<SlavePCName>.SharkControl=MasterPCName
Tell Shark that this PC must communicate to the MasterPC, to control the Logimat.
-
Shark.Application.Config.<SlavePCName>.SharkControlPort=8089
The port that is used for Shark Control Communication.
Test Commands
To test the multple opening function, the following commands are usefull (used from the Telnet interface):
DEFAULTGATE <gate number>
DEFAULTGATE?
For example to retrieve trays to opening 2, use the commands:
>DEFAULTGATE 2
>GETTRAY 5
>GETTRAY 7
…
External Control of the Logimat
There is an optional possibility to perform low level control of the Logimat by using the Web Service interface to Shark Control. The Web Service is a RESTful implementation.
Where Sharks works at a high level with article numbers, location address, etc. the low level interface support control at tray level with basic features like:
- Retrieve a tray.
- Return a tray.
- Get status.
- Controlling tray height changes.
The Web Service interface must be enabled to make it available. It is done in the Shark Registry under Registry->Shark Control->Web Server.
The default port number is 8095, but this can be changed in the configuration.
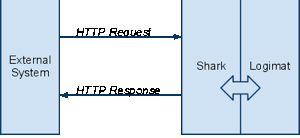
Communication between an external system and Shark/Logimat for low level control.
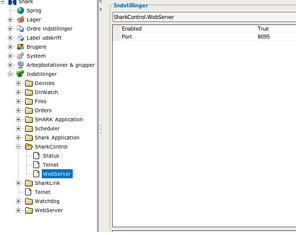
Configuration of the Web Service Port in Shark.
Most of the commands, requires a module name to identify the Logimat. This is due to the fact, that one PC may control more than one Logimats.
The Web Interface can be easily testet by using a standard Web Browser. If it is not possible to access Shark from an external PC, please check the Windows Firewall that might block for external access.
The interface is case sensite, all commands must be lower case.

The response can be seen in the browser window.
The response is XML formattet and relative simple to
interprete.
Supported Commands
The following commands are supported.
/command/logimat/<module>/gettray
Move a tray to the gate. If there already is a tray at the gate, this will be returned first.
The call will return immediately, to get status and information about
when the tray will be ready, use the «statusxml» command to poll for
current status.
Command |
http://<host>:<port>/command/logimat/<Module>/gettray |
Parameters |
traynumber=<tray> tilt = true|false (optional, default false) gate=1|2|3|4 (Opening number) |
Response |
<SharkControl> <Status>OK|Error</Status> <ErrorCode>error code</ErrorCode> <Message>error message</Message> </SharkControl> |
Example |
To get tray 3: To get tray 3 with tilt: http://localhost:8095/command/logimat/a1/gettray?traynumber=3&Tilt=1
To get tray 3 from opening 2: http://localhost:8095/command/logimat/a1/gettray?traynumber=3&Gate=2 |
Procedure to get a tray with support for changed height:
-
Use: “/command/logimat/<module>/gettray” to get the tray.
-
Use: “/query/logimat/<module>/statusxml” to read the status from the Logimat. While the Logimat is working, it is busy and will return state=Busy. Poll the status until state is “OK” og “ERROR”.
/command/logimat/<module>/returntray
Return the current tray at gate.
If the height is changed, the tray will not be returned, but will generate an error. To automatically accept a changed height, add the “accept=true” parameter to the command.
Command |
http://<host>:<port>/command/logimat/<module>/returntray |
Parameters |
gate=1|2|3|4 (Opening number) |
Response |
<SharkControl> <Status>OK|Error</Status> <ErrorCode>error code</ErrorCode> <Message>error message</Message> </SharkControl> |
Example |
Return the current tray in the opening:
Return the current tray from opening 2:
|
/command/logimat/<module>/returntrayacceptheight
Return the current tray at gate. If the height is changed it will be accepted immediately.
Command |
http://<host>:<port>/command/logimat/<module>/returntrayacceptheight |
Response |
<SharkControl> <Status>OK|Error</Status> <ErrorCode>error code</ErrorCode> <Message>error message</Message> </SharkControl> |
Example |
Return the current tray at gate: |
/query/logimat/<module>/statusxml
Returns the current automat status formatted as XML.
It Can be used to detect if the Logimat is busy working, ready for
the next operation or in an error state.
Command |
http://<host>:<port>/query/logimat/<module>/statusxml |
Parameters |
|
Response |
<SharkControl> <Status>OK|Error</Status> <ErrorCode>error code</ErrorCode> <Message>Error message</Message> <Response> <State>state</State> <Text>status text</Text> </Response> </SharkControl>
|
|
Get status for automat A1: |
Status: Is OK when the command is accepted.
State: Is the current state of the Logimat, it can be READY, BUSY, ERROR, NOT_READY or MANUAL. MANUAL means the Logimat is put into manual control by the operator and cannot be remotely controlled, NOT_READY means that the Logimat is not connected or it has not been possible to read the configuration from the Logimat.
Text: Is a textual description of the current state and optional an error message.
/command/logimat/<module>/light/go
Set the location light to a specific position in the tray as a floating number between 0 and 1.
Some positions:
| Tray Position | XPos | Ypos |
| Lower left corner | 0.0 | 0.0 |
| Upper left corner | 0.0 | 1.0 |
| Upper right corner | 1.0 | 0.1 |
| Center | 0.5 | 0.5 |
Command |
Opening 1: http://<host>:<port>/command/logimat/<module>/light/go
Opening 2: |
Parameters |
xpos=<0.0 .. 1.0> tilt=true|false |
Response |
<SharkControl> <Status>OK|Error</Status> <ErrorCode>error code</ErrorCode> <Message>error message</Message> </SharkControl> |
Examples |
Set the light to the middle of the tray (0.5,0.5) :
Set the light to the middle of the tray (0.5,0.5) with tilt activated:
|
/command/logimat/<module>/lift?Height=<height>
Set the height of the optional lift.
The lift cannot work with a tray in the opening or when the Logimat is operating.
Command |
http://<host>:<port>/command/logimat/<module>/light/go |
Parameters |
height=<0.8 .. 1.0> The height of the lift in meters |
Response |
<SharkControl> <Status>OK|Error</Status> <ErrorCode>error code</ErrorCode> <Message>error message</Message> </SharkControl> |
Example |
Set the lift height to 0.9 meter: http://localhost:8095/command/logimat/a1/lift?height=0.9 |
/command/logimat/<module>/reseterror
This will reset a PLC error.
Command |
http://<host>:<port>/command/logimat/<module>/reseterror |
Parameters |
none |
Response |
<SharkControl> <Status>OK|Error</Status> <ErrorCode>error code</ErrorCode> <Message>error message</Message> </SharkControl> |
Example |
Reset an error condition: http://localhost:8095/command/logimat/a1/reseterror |
Error Codes
The following error codes may be returned.
| Error Code | Description |
|---|---|
| 1 | OK |
| 1000 | Syntax error |
| 1018 | General error code. Will for example be returned due to an unknown REST command. This can happen during initialization, before the Logimat module is started. |
| 1028 | Not yet initialized. |
| 1203 | Automat is in manual mode. |
| 1204 | Goods height is exceeded. |
| 1235 | Goods height has changed. This means that the tray will not be returned until the change of height has been accepted. |
Command Interface
The Telnet Interface to Shark Control supports low level control of the Logimat for debugging. Some convenient commands are (the examples is if the module is called A1):
Get a list of all trays:
>LOGIMAT:A1:TRAY:LIST?
**Get information about a specific position: **
>LOGIMAT:A1:TRAY:POSITION? <position number>
Returns: <position>,<tray>,<height in mm>
Set a specific position:
>LOGIMAT:A1:TRAY:POSITION <position>,<tray>,<height in mm>
Simulation Mode
A simulation mode is available where the physical Logimat is simulated. The purpose is not make a 100% simulation, but to test an installation before the physical automats are available. It can also be used with Shark installations used for testing.
To use the simulation mode, set the Shark Control device type to “AutomatSimulateIHO”.
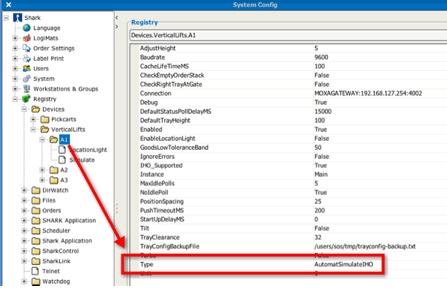
The simulator needs some knowledge about the possible configuration of the automat. Normally this information will be retrieved from the PLC in the machine, but when the machine is not available the information is needed somehow else. Shark Control allows the configution to be read from a file. Which file is specified in the Shark Registry.
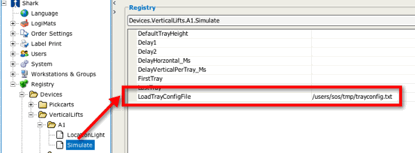
The parameter is named “LoadTrayConfigFile”. The file is a text file that can be generated from a real installation, using the Shark Control command:
Logimat:A1:Tray:SaveTrayConfig <filename>
(replace “A1” by the module name)