SHARK XML Host Link
- Quick Start
- Planning the Integration
- General Rules
- Master Data
- Inbound Orders
- Outbound Orders (Picking)
- File Exchange
- Work Processes
- Article Master Data
- Rename an Article Number
- Create an Order
- Order Cancel
- Order Acknowledge
- Order State
- Stock Count Request
- Stock Report
- Configuration
- XSLT Transformations
- Customizations
- Configuration
- Configuration of the XML Importer
- Integrating SHARK WMS Cloud and local files
- Error Codes
This document outlines the process for integrating SHARK with an external Host System using XML files. The Host System is typically an ERP (Enterprise Resource Planning) system, but it can also be another Warehouse Management System (WMS) or a production system.
The Host interface, known as SHARK Link, is an application that facilitates communication between SHARK and external Host/ERP systems. SHARK Link enables real-time handling of orders and the exchange of other critical information, such as article master data, inventory requests, and more.
Through SHARK Link, orders can be transmitted from the Host System to SHARK. Once SHARK processes an order, an acknowledgment is sent back to the Host System. Additionally, SHARK Link can report stock adjustments when the actual inventory levels differ from the expected counts or when an order cannot be fully fulfilled.
Overall, the goal of SHARK Link is to ensure seamless integration between SHARK and the Host System, allowing them to function as a unified, cohesive system.
Quick Start
Here are some minimum examples of XML files.
Simple Pick Order
Below is a minimum example of a pick order picking 2 lines from the warehouse.
<?xml version="1.0" ?>
<SHARK-ERP>
  <Order>
    <OrderNumber>1000</OrderNumber>
    <OrderTypeID>1</OrderTypeID>
    <OrderLine>
      <ArticleNumber>ART001</ArticleNumber>
      <Qty>5</Qty>
    </OrderLine>
    <OrderLine>
      <ArticleNumber>ART002</ArticleNumber>
      <Qty>2</Qty>
    </OrderLine>
  </Order>
</SHARK-ERP>
OrderTypeID=1 tells it is a outbound (pick) order.
Planning the Integration
Some issues that must be clarified to make a successfully integration are:
| Requirement | Transaction Type | Notes |
|---|---|---|
| To pick by orders from the Host | Order Picking | |
| Only store articles manually | Master Data. | If put-away is done manually without orders from a Host system, SHARK should as a minimum know the article numbers and article description in advance. It is possible to create new articles directly by entering the number, but dangerous if the operator makes a mistake. |
| Store articles by orders from the Host | Order Put-Away / Master Data | |
| Picking confirmation to the host | Order Confirm | This will confirm the pick is done and if there was any deviations from the requested quantity |
| Put-Away confirmation to the host | Order Confirm | This will confirm the store is done and if there was any deviations from the requested quantity |
| Message to the host when the stock is changed without a Host order | Order Confirm | When the stock is adjusted due to a manual pick, store or adjustment, SHARK generates an internal order to track this, the order can be confirmed back to the Host. |
| Is order cancel needed? | Order Cancel | If an order is not yet started, fit can be cancelled. |
| Will orders be modified after they are sent? | Order Pick / Put-Away | This is not recommended, but possible with some limitation. Orders are expected to be send in óne file, it is not possible to append to an existing order, so if the order is modified, resend the whole order again. The reason for this limitation, is that errors are easily generated if appending to an order was allowed. For example if the same file for some reason is read twice, this would result in duplicated order lines. |
| Will the Host generate stock counting requests | Stock Count | |
| Is stock reports needed? | Stock Report | |
| Is serial numbers used? | ||
| Is batch numbers used? |
A folder (directory) accessible on the network for both systems is used for data exchange. If the native XML format is used, this format must be implemented by the host system. XML files is the format with the most extended support.
SHARK Link supports a number of different type of information, that can be exchanged between the two systems, the most common are:
Article Master Data. SHARK has a local database for articles. This database can either be maintained manually or by receiving the information from the ERP system. The New Article format creates a new entry or updates the information for an existing article and thereby free the user for the double work of maintaining two databases.
Order Request. By sending an Order Request, the ERP system requests the specified items to be picked from the storage. There are different type of orders, like picking orders and put-away orders.
Order Acknowledge. When an order has been picked the SHARK software acknowledge the order by an Order Acknowledge telegram. The purpose is both to indicate that the order processing has been completed, but also to adjust the order in case it could not be completely fulfilled, for example if not all the requested articles are available on the stock.
Inventorying control. SHARK can send stock adjustments to the host and the host can request stock counting for a specific article.
There are 2 basic types of orders:
- Picking orders.
- Put-away orders.
But there can be many sub order types. A unique order is identified by:
- The Order Number (50 characters).
- The Delivery Number.
- The Order Type ID, a number from 1 - 65000.
General Rules
Numbers
Numbers are typical quantities. Both whole numbers and signed numbers are allowed. The decimal separator is always US style “.” . In most cases the sign is positive and follows the in/outbound direction of the order, so for an inbound order the quantity is positive and the same for an outbound order. The exception is for stock adjustments confirmation where the adjustment quantity is positive if the stock increase and negative if the stock is decreased.
Master Data
Master data is basic information about the articles. The most important information is the article number and description, but other information can be transferred as well. SHARK will create new articles and update the description, when met in an imported order, but the Master Data allows more information and will also work if SHARK is used with the Manual Transactions (transactions with no host-orders), this could be the case in an initial store process, where goods are moved from old locations into SHARK without orders.
Master data is send by the host, there is no response back from SHARK
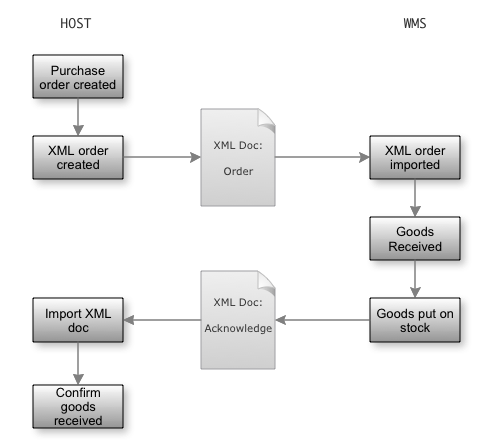
Inbound Orders
The Host may send an order when inbound goods are expected. When the goods are received, it will be matched against the order. Typical reasons to receive goods are:
- Purchase orders.
- Returned goods from customers.
- Produced items from own production.
- Replenishment from other storage locations.
When the goods are stored on the final location, it is reported back to the host. To tell the host that the goods are ready to be picked and an invoice for the goods can be accepted. This is typical done per stored transaction.
It is recommended that the file is created with a temporary extension and renamed when the file is ready. This to prevent the file to be read, before it is finalized by the host.
The file is moved to a temporary folder. This to ensure that nobody else uses the file and if the “Import” folder is on an external drive, to speed up the processing speed.
SHARK Link process the file from the temporary folder.
If the processing was successful the file is moved to the log folder else the file will be moved to the “Error” folder. ng of incoming goods can be received in several deliveries and the put-away process may take a while.
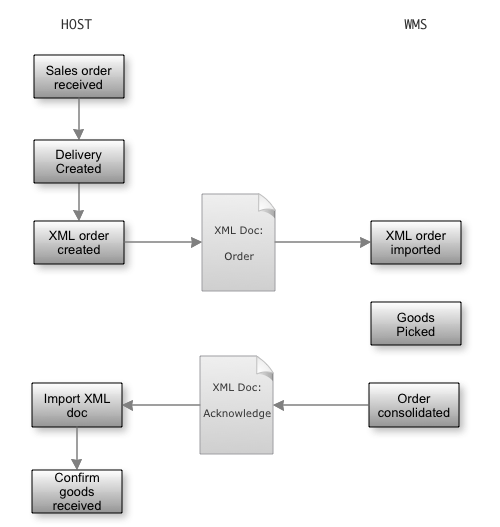
Basic flow of goods reception with acknowledgement back to the host for each received line
(1) The Host might send the inbound order as soon as possible (when it is created) or delayed until it is needed. It is also possible to make the actually registration in the Host System and then let the Host send an in-bound order with the actually received goods. This might end in a two step process, but can have other advantages.
Partly Deliveries
Inbound orders are often partly delivered, this means that the expected quantity to be received must be registered at several times. To make the Host aware of the received goods, it can be practical to confirm by transactions, this means that the same order line can be confirmed several times.
Updating Purchase (put-away) Orders
It can be required to modify an already sent order. This is possible with the limitation, that when the first goods are registers on one order line, it can no longer be changed. When changing an order the whole order is send again.
Special Requirements
Some special requirements can optionally be supported like:
- Reservation of articles for a specific picking order.
- Inspection of incoming goods.
- Registration of batch/lot and serial numbers.
Reserved Purchases
A feature that support purchases reserved for a specific sales order.
Incoming Inspection
Used to flag purchases that must be inspected before they are released for picking.
Batch Number Registration
The batch number of incoming goods must be registered. The batch number can be reported back to the Host.
Serial Number Registration
Serial numbers of incoming articles must be registered. The serial number can be reported back to the Host.
Outbound Orders (Picking)
The Host sends orders to request goods to be picked. This can for example be sales orders to customers or production orders.
Confirmation back to the host can be:
- When the order is finalized and confirmed.
- When the order is picked completely (no confirmation).
- Line by line.
Import Rules for Orders
The following table shows the configuration parameters and how SHARK reacts in various situations when importing picking orders.
| Parameter | Value | Note | |
|---|---|---|---|
| AutoCreateItem | True | False | If true, unknown articles will be created when needed. |
| CancelOrderLinesWithoutStock | True | False | If true the stock must be present else the orderline will be deleted. |
| ItemNumberUnique | True | False | The same article number must only appear once per order. |
| ConfirmPickPerLine | True | False | Acknowledge generated immediately for each pick line. |
| ConfirmPutPerLine | True | False | Acknowledge is generated immediately for each put-away line. |
| LinkDeleteZeroLines | True | False | If a line is received with a 0 count, it will be deleted. Used to cancel lines existing orders. |
| ReleaseOrderMode | Auto | Manually | Orders must be released before they can be picked. Auto mode will release the order immediately when received. |
| ReplaceOrders | True | False | If the same order is receved 2 or more times, the order will replace the previous one. If false the lines will be appended. |
Updating Pick Orders
Some times it might be required to update an existing pick order. This should be avoided if possible, but if not, here is the rules and behavior when it happens.
To start, it is important to understand the life-cycle of an order.
When an order is resend, with the same order number/delivery note number, it will replace the existing order and delete the previous order!
| Order State | Result |
|---|---|
| Not released/not started | The old order will be deleted and a new created. |
| Not released/partly picked | The old order will be deleted and a new created. |
| Released | The order update will fail and rejected. Recall the order first. |
| OK (finished) | The old order will be deleted and a new created. |
File Exchange
The standard way of connecting a Host System and SHARK is by means of file exchange. The exchange of files between the host and SHARK is done by shared folders or by FTP. Other strategies may be used as well.
Importing files
The folder used for transaction exchange can freely be selected on the local network. It is defined in the SHARK registry. The import strategy is:
The folders used for importing files.
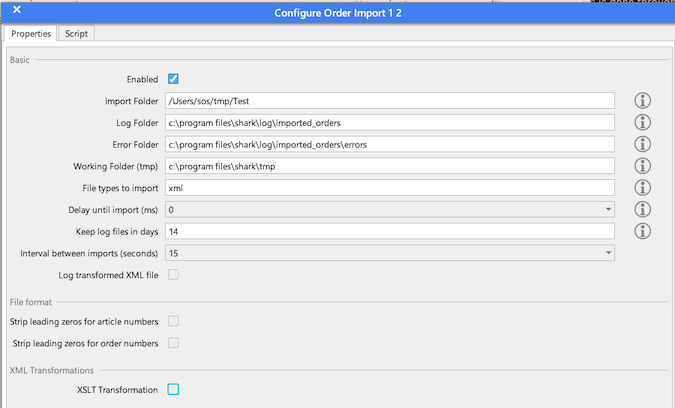
The definition of the import folders are done from a SHARK client, in the registry setup, an example is shown below:
Figure 1 - The registry setup in SHARK defining folders used for file import.
Exporting Files
Acknowledge information back to the host is typical done by exporting files.
Cleaning up the Log Folders
All imported files will as default be saved in the “Log” folder. This folder will after a short period be filled up with files if nothing was done. To avoid this SHARK Link includes a folder cleaning function that automatically delete the files when they are older than a specified number of dates. For larger system 3 days can be appropriated, for smaller installation 30 days can be OK. The nice thing about the log folder is, that files can be reimported in case something goes wrong and it is easy to pin-point a problem because the original data can easily be found.
The error folder is not automatically cleaned.
Files Names
To some extend, it is possible to customize the file names for written files. This is done using placeholders in the export file definition that will be replaced by the actually value, when the file is written.
| Placeholder | Description |
|---|---|
| %DocType% | Name of the document as defined in SHARK |
| %OrderNumber% | Order number from SHARK |
| %Index% | Document index number. This is a running unique number. |
| %Date% | Date when the file is written. The format is YYYYMMDD, for example is the august 2th 2012, written as 20120802 |
| %Time% | Time as HHMMSS, 17:25 and 15 seconds is written as 172515. |
The XML File Interface
XML is the native format of SHARK and is the recommended way of implementing an interface to a host.
XML provides a standard way of representing hierarchical, structured data. XML make use of mark-up tags, similar to HTML, indicating how data should be interpreted by the application.
Support transactions:
For configuration of the importer, look here.
All the XML files must have the extension .xml
General comments:
- The element names are case sensitive.
- New lines and indentation is only used to make the XML readable, they are not required and can be used freely.
- XML files can be displayed in a Web Browser (nicely formatted, for example in Internet Explorer).
- The formats can be combined, so article information can for example be sent in the same XML file as the order and orders and put-away requests can be combined in the same file. This makes the format very flexible.
- In general it is recommended to use UTF-8 as encoding of the XML
files. The XML header should look like:
<?xml version=”1.0” encoding=’UTF-8’?> - Unrecognised fields will be ignored. This means it is possible to add fields for future use.
Please note that some characters have a special meaning in XML:
| Character | Can be encoded as … |
|---|---|
| & | & |
| < | < |
| > | > |
| ” | " |
| ’ | ' |
Character references provide a way to insert Unicode characters that are identified by a number pointing to a Unicode code point. Code points can be identified using either decimal or hexadecimal notation.
&#value; Syntax used for decimal references.
&#xvalue; Syntax used for hexadecimal references.
Work Processes
Description on the required communication to the Host for various typical work flows.
Put-away Orders
Simple flow when goods have to be stored. Typical this is the result of a purchase order.
Picking Orders
Flow of goods picked by orders. Typical as a result of a sales or production order.
## XML Formats
In the following, the XML formats for the supported transaction types, will be described.
General File Format
All XML files generated by SHARK have a fixed “Document” header that defines an envelope for the document. The header includes a unique document number, the time when it was generated and type of document. The information can be ignored by the host, but can be used to track the document in SHARK.
    <?xml version="1.0" ?>
    <SHARK-ERP>
     <Document>
        <Type>ACKNOWLEDGE</Type>
        <Date>2011-02-17 21:58.08</Date>
        <Sender>SHARKLINK</Sender>
        <Receiver>HOST</Receiver>
        <DocNumber>20</DocNumber>
     </Document>
       … content
    </SHARK-ERP>
Segment Document
| Element | Type | Description |
|---|---|---|
| DocNumber | ^String | The Document Number is a unique id, which identifies the document. Same as DocumentID in the database Document table. |
| Type | ^String | Type of this document. |
| Sender | ^String | Who that generated the document. |
| Receiver | ^String | The expected receiver of this document |
| Date | ^String | Date when the document was generated. |
Article Master Data
File creating new articles or modifying existing ones, in the SHARK database. Sent by the Host system to the SHARK system.
It is recommended to have a clear strategy how the data is maintained. If the Master Data is maintained both in SHARK and from an external system using the XML features, there is a potential risk of inconsistent data.
For most system very little information is needed, only article number and description are required information, the rest to used for supporting various features. Most of the information can also be maintained in the SHARK system itself and there is no need to send the information unless it already is provided by the host system.
Rules:
- If the article already exists, the information will be updated with the new content.
- File extension must be .xml.
- Filename is freely selected.
- No response (acknowledge) is generated by this transaction.
- If a box type is specified, this will be the default box type for that article, until a another box type is specified.
- If a storage strategy is specified (by <LocationType>), this will be the strategy used for future articles of that type.
- If new Package Sizes, Replenishemt Information and Location Types are specified, old information will as default be deleted, unless the attribute Clear=’false’ atttribute is specified on the Packages tag.
Example 1 – simple master data file:
<?xml version="1.0" ?>
<SHARK-ERP>
  <Article>
    <ArticleNumber>Article number</ArticleNumber>
    <Description>Article description</Description>
</Article>
</SHARK-ERP>
Text in italics is optional.
A more complex example of creating master data for an article ART001 that should be stored in Zone “A” on the location type “Small Box”, in each of the locations of type “Small Box”, 200 pieces will fit.
<?xml version="1.0" ?>
<SHARK-ERP>
  <Article>
    <ArticleNumber>ART001</ArticleNumber>
    <Description>Article 1</Description>
    <Packages>
      <Package>
        <Replenishments>
          <Replenishment>
            <Zone>A</Zone>
          </Replenishment>
        </Replenishments>
        <LocationTypes>
          <LocationType>
            <Name>Small Box</Name>
            <Qty>200</Qty>
          </LocationType>
        </LocationTypes>
      </Package>
    </Packages>
  </Article>
</SHARK-ERP>
Example with most of the possible information added:
<?xml version='1.0' encoding='UTF-8'?>
<SHARK-ERP>
  <Article>
    <ArticleNumber>Article3</ArticleNumber>
    <Description>Article 3</Description>
    <ABC>B</ABC>
    <Packages>
      <Package>
        <Name>Pcs</Name>
        <Height>100</Height>
        <Width>200</Width>
        <Depth>300</Depth>
        <PackageSize>1</PackageSize>
        <Replenishments>
          <Replenishment>
            <Zone>A</Zone>
            <LocationStrategy>Floating</LocationStrategy>
            <MinQty>10</MinQty>
            <MaxQty>450</MaxQty>
            <ReplenishmentQty>150</ReplenishmentQty>
            <ReplenishmentFrom>B</ReplenishmentFrom>
          </Replenishment>
        </Replenishments>
        <LocationTypes>
          <LocationType>
            <Name>UK2</Name>
            <Qty>150</Qty>
          </LocationType>
        </LocationTypes>
      </Package>
    </Packages>
  </Article>
</SHARK-ERP>
Segment Article
Basic information about the article.
| Element | Type | Description | ||
|---|---|---|---|---|
| ABC | String | Set the picking rate class for the this article. Default names are ‘A’, ‘B’ or ‘C’, but this can be changed in the configuration. The name must be an existing on | ||
| ArticleNumber | String | Unique article number defining the item, despite the name, it is a string that can contain both numbers and letters. | ||
| ArticleGroup | String | Optional article group/class value. | ||
| Description | String | Name of the article | ||
| Description1 | String | 1. extra description of the article | ||
| Description2 | String | 2. extra description of the article | ||
| AlternativeArticleNumber1 | String | An alternative to the article number. Visibility in the Article Browser is optional. | ||
| AlternativeArticleNumber2 | String | An alternative to the article number. Not visible in the Article Browser. | ||
| EAN | String | EAN number | ||
| ERPCount | Number | The Host systems stock quantity, used to compare SHARK stock with the Host stock. | ||
| LocationStrategy | String | FIFO | Fixed | Floating |
| Misc1 | String | Optional field for customized information. The first 5 are visible in the Article Browser. | ||
| Misc2 | String | Optional field for customized information. The first 5 are visible in the Article Browser. | ||
| Misc3 | String | Optional field for customized information. The first 5 are visible in the Article Browser. | ||
| Misc4 | String | Optional field for customized information. The first 5 are visible in the Article Browser. | ||
| Misc5 | String | Optional field for customized information. The first 5 are visible in the Article Browser. | ||
| Misc6 | String | Optional field for customized information. The first 5 are visible in the Article Browser. | ||
| Misc7 | String | Optional field for customized information. The first 5 are visible in the Article Browser. | ||
| Misc8 | String | Optional field for customized information. The first 5 are visible in the Article Browser. | ||
| Misc9 | String | Optional field for customized information. The first 5 are visible in the Article Browser. | ||
| Misc10 | String | Optional field for customized information. The first 5 are visible in the Article Browser. | ||
| MarkForDeletion | True/False | If true the article will be deleted if possible else it will marked for later deletion. It cannot be used in new orders or put-away operations. The article cannot be deleted immediately, because it might have database references. | ||
| BatchNumberRequired | True/False | If true a batch number must be registered when picked or stored. | ||
| SerialNumberRequired | True/False | False: Never (0), True:Always(1) | ||
| SerialNumberRequiredInbound | True | Inbound(2) | ||
| SerialNumberRequiredOutbound | True | Outbound(3) | ||
| SerialNumberRequiredTracked | True | Tracked(4), (not released yet, from build 2428) |
Segment Article/Packages/Package
This Segment is OPTIONAL.
This segment defines one or more package size(s) for the article.
The Package tags must be specified, even only one package size is used for the article.
| Element | Type | Description |
|---|---|---|
| Name | String | Name of the package, for example “PCS”. “Stuck” or “Pallet”. Default is “P1” |
| Height | Float | Height in mm. |
| Width | Float | Width in mm. |
| Depth | Float | Depth in mm. |
| PackageSize | Float | Number of items in basic unit (pieces) for this package size. Default is “1”. |
Only text in bold are required.
Segment Article/Packages/Package /LocationTypes/LocationType
This Segment is OPTIONAL.
This segment defines a location type where the article should be stored.
The Location Type must exists as locations before this can be specifiied.
| Element | Type | Description |
|---|---|---|
| Name | string | Name of the location type |
| Qty | float | Quantity to store on this location type |
Segment Article/Packages/Package /Replenishments/Replenishment
This Segment is OPTIONAL.
This segment defines where the article should be stored and from where the zone should be replenished. More than one Replenishment segment can be defined.
| Element | Type | Description | ||
|---|---|---|---|---|
| Zone | string | Zone name where the articles can be stored. The zone must exists with locations. | ||
| ReplenishmentFrom | string | Name of zone to replenish from. | ||
| MinQty | float | Reorder level of automatic replenishment (if supported) | ||
| MaxQty | float | Maximum quantity to store in the zone | ||
| ReplenishmentQty | float | Quantity to use for replenishment orders | ||
| LocationStrategy | String | Fixed | Floating | FIFO (default is floating) |
Only text in bold are required.
Example: Defines that maximum 850 pieces will fit into the location type “Small Box” of the article “ART001”.
<?xml version="1.0" ?>
<SHARK-ERP>
  <Article>
    <ArticleNumber>ART001</ArticleNumber>
    <Packages>
      <Package>
        <LocationTypes>
          <LocationType>
            <Name>Small Box</Name>
            <Qty>850</Qty>
          </LocationType>
        </LocationTypes>
      </Package>
    </Packages>
  </Article>
</SHARK-ERP>
Rename an Article Number
Rename an article number. All references will remain. The transaction log will show the old number. Orders will use the new numbers, even if they have been send with old numbers.
It is only allowed to change articler number in the same owner group.
| Element | Type | Description |
|---|---|---|
| ArticleNumberOld | String | This is the existing article number |
| ArticleNumberNew | String | This is the new order number |
| Owner | String | Optional owner field, if the warehouse has multiple owners. Skip this field if not used. |
<?xml version="1.0" ?>
<SHARK-ERP>
  <ArticleRename>
    <ArticlerNumberOld>ART001</ArticleNumberOld>
    <ArticlerNumberNew>ART345</ArticleNumberNew>
  </ArticleRename>
</SHARK-ERP>
This will rename article ART001 to ART345.
Create an Order
The “Order” is generated by the Host system to create a new order. Orders can be both pick and put-away (goods in/goods out), the OrderTypeID defines the type and direction of the order.
Example:
<?xml version="1.0" ?>
<SHARK-ERP>
  <Order>
    <OrderNumber>order number</OrderNumber>
    <OrderTypeID>order type id</OrderTypeID>
    <Owner>company name</Owner>
    <Priority>priority</Priority>
    <Customer>
      <Number>Customer Number</Number>
      <Name>Customer Name</Name>
    </Customer>
    <Address>
      <Street>Street</Street>
      <City>City</City>
      <ZipCode>zip code</ZipCode>
      <Country>Country</Country>
    </Address>
    <DeliveryAddress>
      <AddressLine1>Street</AddressLine1>
      <AddressLine2>Street line 2</AddressLine2>
      <AddressLine3>City</AddressLine3>
      <AddressLine4>zip code</AddressLine4>
      <AddressLine5>Country</AddressLine5>
    </DeliveryAddress>
    <DeliveryDate>date</DeliveryDate>
    <Reference>Reference</Reference>
    <Shipment>Name</Shipment>
    <OrderLine>
      <LineNumber>linenumber</LineNumber>
      <ArticleNumber>Article Number</ArticleNumber>
      <Qty>Number of items</Qty>
      <Note>Item note or description</Note>
      <BatchNumber>batch number</BatchNumber>
      <BatchDate>date</BatchDate>
      <BoxType>location type</BoxType>
      <Misc1>misc 1</Misc1>
    </OrderLine>
  </Order>
</SHARK-ERP>
Minimum example for a SHARK WCS pick list where stock is controlled by the host system:
<?xml version="1.0" ?>
<SHARK-ERP>
  <Order>
    <OrderNumber>1000</OrderNumber>
    <OrderTypeID>1</OrderTypeID>
    <OrderLine>
      <ArticleNumber>ART001</ArticleNumber>
      <Qty>5</Qty>
      <Location Zone='A' Module='1' Tray='5'>A1-5-01</Location>
    </OrderLine>
  </Order>
</SHARK-ERP>
This will generate a pick from the system with order number = “1000” of 1 line with article “ART001” from module 1, in zone A
and tray number is 5. The displayed location adddress will be “A1-5-01”. The host must here explicit specify the physical location
by the attributes in the
Segment Order
| Element | Type | Description |
|---|---|---|
| OrderNumber | string | The order number is a reference number, that in combination with the OrderType and the DeliveryNoteNumber defines a unique order. |
| OrderTypeID | int | OrderTypeID defines the type of the order. The default types are: 1=pick, 2=put-away. Other types can be defined as needed. |
| Owner | string | Optional owner (company) of this order. In case an owner is specified, all articles in the order must be owned by the specified owner. |
| DeliveryNoteNumber | string | A delivery number used when an order is delivered in more trunks. |
| Priority | string | Priority is a number between 0 and 255. Default is 127, 0 is lowest and 255 is express orders. |
| DeliveryDate | string | Date the order should be delivered. The default date format is yyyy-mm-dd. The date format can be modified. |
| Note | string | Free order note. |
| Shipment | string | Type of shipment. Information to the consolidation and shipment area and to an optional freight system. |
| Carrier | String | Name of the transport company that will pick up a pick order. |
| Tour | string | Orders can be picked to different tours. This parameter can be used to tell the system, that the order must be delivered with the specified tour. |
| Gate | string | Where the order will be picked up, when leaving the warehouse. |
| Misc1 | string | Miscellaneous field for customized functionality. |
| Misc2 | string | Miscellaneous field for customized functionality. |
| Misc3 | string | Miscellaneous field for customized functionality. |
| Misc4 | string | Miscellaneous field for customized functionality. |
| Misc5 | string | Miscellaneous field for customized functionality. |
| Misc6 | string | Miscellaneous field for customized functionality. |
| Misc7 | string | Miscellaneous field for customized functionality. |
| Misc8 | string | Miscellaneous field for customized functionality. |
| Misc9 | string | Miscellaneous field for customized functionality. |
| Misc10 | string | Miscellaneous field for customized functionality. |
Text in bold is required
The OrderTypeID defines the type of the order. Custom types can be created, but there is a number of standard values as listed here:
| OrderTypeID | Description | Qty |
|---|---|---|
| 1 | Standard outbound order (Picking) | Qty is always positive |
| 2 | Standard inbound order (putaway) | Qty is always positive |
| 8 | Pick for internal replenishment | Qty is always positive |
| 9 | Store for internal replenishemnt | Qty is always positive |
| 10 | Relative adjustment. Used when the stock is adjusted directly | Qty reflects the stock change and is negative when the stock is decreased. |
| 11 | Absolut adjustment. Used when the stock is adjusted directly | |
| 15 | Picking without an order | Qty is negative |
| 16 | Store without an order | Qty is always positive |
| 17 | Setting the location to an absolut value | Qty reflects the stock change and is negative when the stock is decreased. |
| 18 | Stock counting relative adjustment | Qty reflects the stock change and is negative when the stock is decreased. |
| 19 | Qty is always positive |
Segment Order/Customer (optional)
| Element | Type | Description |
|---|---|---|
| Number | string | Customer number is a unique number for the customer. For purchase orders this is the supplier of the goods. |
| Name | string | The name of the customer |
Segment Order/Address (optional)
Customer address information.
| Element | Type | Description |
|---|---|---|
| Street | string | Address (street) related to the Customer |
| City | string | Address (city) related to the Customer |
| ZipCode | string | Address (zip code) related to the Customer |
| Country | string | Address (country) related to the Customer |
Segment Order/DeliveryAddress (optional)
Delivery address for the shipment.
| Element | Type | Description |
|---|---|---|
| AddressLine1 | string | Line 1 of the delivery address |
| AddressLine2 | String | Line 2 of the delivery address |
| AddressLine3 | String | Line 3 of the delivery address |
| AddressLine4 | String | Line 4 of the delivery address |
| AddressLine5 | String | Line 5 of the delivery address |
| AddressLine6 | String | Line 6 of the delivery address |
| AddressLine7 | String | Line 7 of the delivery address |
| AddressLine8 | String | Line 8 of the delivery address |
| AddressLine9 | String | Line 9 of the delivery address |
| AddressLine10 | string | Line 10 of the delivery address |
Segment Order/OrderLine
| Element | Type | Description |
|---|---|---|
| ArticleNumber | String | The article number is a unique identification of an article in combination with the Owner. |
| ArticleDescription | String | The article number is a unique identification of an article in combination with the Owner. |
| BatchNumber | String | Optional batch number for the articles. |
| BatchDate | String | Batch date is typical the latest date the article can be sold. Default date format: yyyy-mm-dd. |
| SerialNumber | String | Optional serial number for the article. If specified quantity must be 1. |
| LineNumber | String | An integer that will be used in the returned acknowledge and thereby creating a link between order and acknowledge lines. If not specified, a running number starting from 1 for each order, will be used. |
| Location | String | Location address used to force picking from specific location or to select specific tray/module. The element has 3 optional attributes: Zone, Module, Tray. This element is only support by SHARK WCS. |
| Qty | Float | Article quantity. Default decimal separator is “.”. |
| Unit | String | The article unit is the package size in SHARK. |
| Note | String | Optional note that will be displayed to the operator when the order line is picked. |
| QualityInspection | True/False | Optional flag used with the Quality Inspection feature. It will force inspection at goods reception. |
| TargetZone | String | Used for put-away orders to request the articles to go to a specific zone. |
| Reservation | String | Used for purchase orders, to reserve the article for a specific sales order. Use the sales order numeber as reservation number. |
| Misc1 | String | Miscellaneous field for customized functionality. |
| Misc2 | String | Miscellaneous field for customized functionality. |
| Misc3 | String | Miscellaneous field for customized functionality. |
| Misc4 | String | Miscellaneous field for customized functionality. |
| Misc5 | String | Miscellaneous field for customized functionality. |
| Misc6 | String | Miscellaneous field for customized functionality. |
| Misc7 | String | Miscellaneous field for customized functionality. |
| Misc8 | String | Miscellaneous field for customized functionality. |
| Misc9 | String | Miscellaneous field for customized functionality. |
| Misc10 | String | Miscellaneous field for customized functionality. |
Text in bold are required elements.
Segment for each line in the order. Repeat for each line. Minimum one line must be present, orders without any lines are not allowed. Only article number and quantity is mandatory.
Reservations
Reservations are used for allocation a specific sales order to a purchase. Use the same reservation number on the inbound and outbound order.
How it works:
-
When the inbound (purchase) order line is received it will create a new article with the article number article/reservation. This ensures that it cannot be picked by other orders.
-
When the outbound (sales) order is received, it looks for the same new article, it it is not yet reserved, the order will be in a back order status.
Note that this reserved article will appear in the stock report as a special item. Also there is no automatic cleanup if the sales order is cancelled after the inbound order is received.
Segment Order/OrderLine/SerialNumbers (optional)
Define an optional list of serial numbers, either to store or to pick. The serial number count must match the quantity for order line.
| Element | Type | Description |
|---|---|---|
| SerialNumber | string | Serial number. |
 <SHARK-ERP>
    <Order>
        <OrderNumber>10001</OrderNumber>
        <OrderTypeID>1</OrderTypeID>
          <OrderLine>
            <LineNumber>1</LineNumber>
            <ArticleNumber>HAM01</ArticleNumber>
            <Qty>1</Qty>
            <SerialNumbers>
            	<SerialNumber>1001</SerialNumber>
            </SerialNumbers>
        </OrderLine>
    </Order>
</SHARK-ERP>
Simple pick of a specific serial number
Segment Order/OrderLine/PartList
| Element | Type | Description |
|---|---|---|
| PartListOrderTypeID | integer | Order Type ID for the part list. Must be defined ahead of th PartListNumber. |
| It is recommended to use another Order Type ID for the part list than the master order. | ||
| PartListNumber | string | This is the name of the part list. |
| Qty | float | Number of part lists to pick |
The XML file importer supports creation of parts list from a master order. This feature allows a single order line to be broken down into multiple picks of different articles and thereby supporting a setup where the articles stored in the warehouse are sub components of a structure. The part list is supplied with each order from the host and is not stored in SHARK, this means all maintenance of the part list is done in the Host system.
Each order line that contains a part list will create a separate sub-order. The sub order with the part list has to be picked before the master order and must be stored on a location first. This is usefull if picking the part list also involves some small production, like for example assembly of the parts or just packing of the product.
In the master order, the part list will be seen as an article with the name:
<master order number>.<part list number>
This means the picked part list order will be stored with a unique article number, to ensure it goes to the correct master order.
The Master Order will have a back order status, until all part lists in the order have been picked.
Optional the part list may generate a put-away order.
Example:
<?xml version="1.0" encoding="utf-8"?>
<SHARK-ERP>
  <Order>
    <OrderNumber>122606</OrderNumber>
    <OrderTypeID>1</OrderTypeID>
    <OrderLine>
      <LineNumber>1</LineNumber>
      <ArticleNumber>3817783</ArticleNumber>
      <Qty>1</Qty>
      <ArticleDescription />
    </OrderLine>
    <OrderLine>
      <LineNumber>2</LineNumber>
      <ArticleNumber>3817783</ArticleNumber>
      <Qty>5</Qty>
    </OrderLine>
    <OrderLine>
      <Qty>1</Qty>
      <PartList>
        <PartListNumber>PartList1</PartListNumber>
        <PartListLine>
          <Article>3817783</Article>
          <Qty>2</Qty>
        </PartListLine>
        <PartListLine>
          <Article>876294</Article>
          <Qty>1</Qty>
        </PartListLine>
      </PartList>
    </OrderLine>
  </Order>
</SHARK-ERP>
This will create 2 or 3 orders, one with order number “122606” and one with order number “122606.PartList1”.
If the system is configured to also generate a put-away order, an inbound order with the order number “122606.PartList1” and with one article PartList1” will be generated as well.
Please note that using part lists typical requires some configuration and perhaps changes to the database, to make it work as expected.
Segment Order/CustomFields
Custom fields are used for adding key/value pairs to the order which is not supported by the general order format.
| Element | Type | Description |
|---|---|---|
| Field | Use Attribute Name and Value |
 <? xml version="1.0" ?>
 <SHARK-ERP>
     <Order>
         <OrderNumber>1234567</OrderNumber>
         <CustomFields>
           <Field Name='Address.DropPoint.1' Value='Lyngsoe Alle 3A'\>
           <Field Name='Address.DropPoint.2' Value='Hoersholm'\>
           <Field Name='Address.DropPoint.3' Value='2970'\>
         </CustomFields>
         <OrderTypeID>2</OrderTypeID>
           <OrderLine>
             <LineNumber>1</LineNumber>
             <ArticleNumber>000001</ArticleNumber>
             <Qty>100</Qty>
         </OrderLine>
     </Order>
 </SHARK-ERP>
Order Cancel
Use this format to Cancel an existing order.
Note this may fail if cancel is not possible, for example if the order is already being processed.
Syntax:
Elements written in bold are required. The rest is optional.
<?xml version=\"1.0\" ?>
<SHARK-ERP>
    <OrderCancel>
        <OrderNumber>order number</OrderNumber>
        <OrderTypeID></OrderTypeID>
  <DeliveryNoteNumber></DeliveryNoteNumber>
    </OrderCancel>
</SHARK-ERP>
Segment Cancel
| **Element ** | **Type ** | **Description ** |
|---|---|---|
| OrderNumber | string | |
| OrderTypeID | int | OrderTypeID defines the type of the order. The default types are: 1=pick, 2=put-away. Other types can be defined as needed. |
| DeliveryNoteNumber | String | A delivery number used when an order is delivered in more trunks. |
Order Acknowledge
The order acknowledge is generated by SHARK when processing of an order is finished.
Generation of acknowledge files are an optional feature, that can be enabled/disabled in the configuration setup. If the files are not used, the feature should be disabled, in order to conserve disk space.
Rules:
- For each line in the original order, a similar line is returned, but containing the actually picked number of articles.
- The default name of the order acknowledge file is: ACK-<documentnumber>.xml . This can be configured.
- The file is put in the subfolder Out under the shared exchange folder.
- The generated files are not deleted by SHARK Link, the Host System has the responsibility for this.
- ‘Manual Transactions’ are acknowledged as one line orders.
Syntax:
<?xml version="1.0" ?>
<SHARK-ERP>
    <Document>
      <Type>ACKNOWLEDGE</Type>
      <Date>2011-02-17 21:58.08</Date>
      <Sender>SHARKLINK</Sender>
      <Receiver>HOST</Receiver>
      <DocNumber>20</DocNumber>
    </Document>
    <Acknowledge>
        <Status>Status</Status>
        <OrderNumber>order number</OrderNumber>
        <OrderTypeID>200</OrderTypeID>
        <OrderLine>
        <ArticleNumber>Article Number</ArticleNumber>
        <Qty>Count of actually picked item</Qty>
        </OrderLine>
    </Acknowledge>
</SHARK-ERP>
Segment Acknowledge
| Element | Type | Description |
|---|---|---|
| OrderNumber | String | Order number. |
| OrderTypeID | Integer | Manual Transactions are acknowledged with the OrderTypeID’s: 15 ~ Outbound 16 ~ Inbound 17 ~ Relative adjustments. Order numbers for manual transactions are generates using a prefix defined in the OrderType table and a sequence number based on the order id< |
| Owner | String | Owner of the order (empty if this feature is not used) |
| Status | String | Status: OK/ERROR/CANCEL/PARTLY OK: The order was carried out successfully. ERROR: An unspecified error occurred, for example that the specified article was not found in the system. CANCEL: The order was cancelled from SHARK link or by the operator. PARTLY: The operator has indicated that the order could not be fulfilled because of missing articles. This happens if the actually number of articles does not fit the expected count. |
| FreightCost | Float | |
| Shipment | String | Shipment type set at consolidation. |
| Carrier | String | Transporter used for the order |
| Misc1 | String | Optional text field |
| Misc2 | String | Optional text field |
| Misc3 | String | Optional text field |
| Misc4 | String | Optional text field |
| Misc5 | String | Optional text field |
Segment: Acknowledge/OrderLine
| Element | Type | Description |
|---|---|---|
| Status | String | OK: The order line was processed as requested. Partly: The request could not be completely fulfilled. Cancelled: The line was cancelled. |
| LineNumber | Integer | Order line number |
| ArticleNumber | String | Article number |
| QtyOrdered | Float | |
| Qty | Float | |
| CostCenter | String | |
| CostCenterText | String | |
| User | String | |
| Time | String | eg. 2020-10-29 16:46:57 |
| Misc1 | String | Optional text field |
| Misc2 | String | Optional text field |
| Misc3 | String | Optional text field |
| Misc4 | String | Optional text field |
| Misc5 | String | Optional text field |
| Misc6 | String | Optional text field |
| Misc7 | String | Optional text field |
| Misc8 | String | Optional text field |
| Misc9 | String | Optional text field |
| Misc10 | String | Optional text field |
The <OrderLine> section is repeated for each line in the original order.
An error status response will be generated in case the order could not successfully be imported by SHARK. Possible reasons are: specified articles did not exist in the database, order number is already used, etc. Use the log file for further debugging. Note that syntax errors or other problems that results from an order file that could not be read, will not generate an acknowledge file! This is because the order number can’t be known, in case the order file can’t be read correctly by SHARK.
Segment Acknowledge/OrderLine/Transactions/Transaction
The order line may be split up in transactions, for example if it is stored or picked from different locations. The transaction segment contains specific information related to this, it might be ignored
| Element | Type | Description |
|---|---|---|
| Qty | Float | |
| LocationAddress | String | Location address in the warehouse from where this transaction was handled. |
| User | String | Operator initial for this transaction |
| BatchNumber | String | Batch number |
| DeliveryNote | String | For inbound orders this field may contain a delivery note number entered at goods reception. |
| Locked | Integer | 0: The stock is released for picking. 1: The stock is locked, for example if it is stored for quality inspection. |
Segment Acknowledge/OrderLine/Transactions/Transaction/SerialNumbers
| **Element ** | **Type ** | **Description ** |
|---|---|---|
| SerialNumber | string | Serial number recorded for this order line. There may be 1 to many serial numbers. |
The serial number segment is used to report back serial numbers recorded while the order line is picked or stored. It will only be visible if serial numbers are supported by installation and if any serial numbers are present. The number of serial numbers should match the picked or stored quantity.
Order State
Optional telegram send from SHARK to the Host System to indicate the current state of an order. Used for example by the Host System to check if the order can be changed.
For pick-orders SHARK only allows orders to be updated or replaced when the order is “idle”. This means it cannot be released or in work, in that case an attempt to update the order will fail. If it for some reason is required to update a released order, it must first be recalled. Orders that are finished can be replaced by a new order with the same order number (although not recommended).
Syntax:
<?xml version="1.0" ?>
<SHARK-ERP>
  <OrderState>
    <OrderNumber>order number</OrderNumber>
    <OrderTypeID>200</OrderTypeID>
    <Locked>true|false</Locked>
    <State>Waiting|Released|Working|Picked|Shipped</State>
    <Status>PartlyPicked</Status>
    <Time></Time>
    </OrderState>
</SHARK-ERP>
Segment OrderState
| Element | Type | Description |
|---|---|---|
| OrderNumber | String | The order number. |
| OrderTypeID | Integer | The order type. |
| Locked | Boolean | False: The order can be changed. True: The order cannot be changed. |
| State | String | Waiting/Released/Working/Picked/Shipped |
| Status | String | General order status: Waiting/PartlyPicked/Cancelled/OK |
| Time | String | Time stamp when the state change occured. |
This telegram is an optional feature of the interface.
Stock Count Request
It is possible to send an order to SHARK that requests specific articles to be counted. The format order the order is similar to the normal pick and store orders with the exception that the OrderTypeID is “19”.
The example below will request a count for article ART001 and ART002. The request has the order number S1000.
<?xml version="1.0" ?>
<SHARK-ERP>
  <Order>
    <OrderNumber>S1000</OrderNumber>
    <OrderTypeID>19</OrderTypeID>
    <OrderLine>
      <ArticleNumber>ART001</ArticleNumber>
    </OrderLine>
    <OrderLine>
      <ArticleNumber>ART002</ArticleNumber>
    </OrderLine>
  </Order>
</SHARK-ERP>
Stock Count Report
At the end of a stock counting, a report file is generated.
The result of the inventorying will be returned in a standard acknowledge document with same order number and OrderTypeID. The fields will have this meaning:
| Field | Type | Description |
|---|---|---|
| QtyOrdered | Float | This is the expected stock quantity. |
| Qty | Float | Actually counted quantity. |
The quantity is always the total stock quantity for this article and not only the specific counted location. Thereby the Host System does not have to care about articles stored on multiple locations.
Stock Counting Without Host Orders
It is also possible to generate local inventorying orders in SHARK. This will be reported back as well, but the OrderTypeID will be 18.
Stock Report
Report of the total stock send to the Host. This is typically generated when the two systems are in an “idle” state – in other words, when no picking are in progress. It can either be send automatically when an inventory counting order is finished or manually on request.
Segment StockReport\Order (One instance)
| Element | Type | Description |
|---|---|---|
| OrderID | Integer | |
| OrderNumber | String | |
| OrderTypeID | Integer | |
| Misc1 | String | |
| Misc2 | String | |
| Misc3 | String | |
| Misc4 | String | |
| Misc5 | String |
Segment StockReport/Article (one or more instances)
| **Element ** | **Type ** | **Description ** | |
|---|---|---|---|
| ID | integer | Line number from the Stock Order being reported | |
| ArticleNumber | string | ||
| Owner | string | Optional | |
| BatchNumber | string | Optional | |
| SerialNo | string | Optional | |
| Unit | string | Optional | |
| StockDate | date | ||
| CountedBy | string | Optional | |
| QtyExpected | int | ||
| QtyCounted | int | ||
| QtyDiff | int | QtyCounted - QtyExpected | |
| QtyInGoodsReception | float | Store Qty not yet reported to ERP | |
| QtyInConsolidation | float | Pick Qty not yet reported to ERP | |
| LocationCount | int | Number of locations the article can be found at |
<StockReport>
    <Order>
        <OrderID>14</OrderID>
        <OrderNumber>CC_-3-3</OrderNumber>
        <OrderTypeID>18</OrderTypeID>
    </Order>
    <Article>
        <ID>2533</ID>
        <ArticleNumber>31969</ArticleNumber>
        <BatchNumber>74</BatchNumber>
        <CountedBy>System(sys)</CountedBy>
        <QtyExpected>3</QtyExpected>
        <QtyCounted>3</QtyCounted>
        <QtyDiff>0</QtyDiff>
        <QtyInGoodsReception>0</QtyInGoodsReception>
        <QtyInConsolidation>0</QtyInConsolidation>
        <NumberOfLocations>1</NumberOfLocations>
    </Article>
    <Article>
        <ID>581</ID>
        <ArticleNumber>20420</ArticleNumber>
        <BatchNumber>86</BatchNumber>
        <CountedBy>System(sys)</CountedBy>
        <QtyExpected>2</QtyExpected>
        <QtyCounted>2</QtyCounted>
        <QtyDiff>0</QtyDiff>
        <QtyInGoodsReception>0</QtyInGoodsReception>
        <QtyInConsolidation>0</QtyInConsolidation>
        <NumberOfLocations>1</NumberOfLocations>
    </Article>
</StockReport>
Configuration
The Automatic report is generated by the database stored procedure Document_MakeStockCountedReport_OrderID.
The actually format of the report can be modified in this procedure.
The Automatic report is generated to the Document Port “StockReport”. The document system must be configured to output port “StockReport” to the requested target location.
The OrdertypeID 19 (used for Automatic report) must be configured:

Set ConfirmMode = 1 and ConfirmPort = “StockReport”
If user created inventory reports should be reported, then configuer OrdertypeID 18, the same way as OrderTypeId 19
Registry: Scheduler.jobs.StockReport
| Registry | Type | Value | Description |
|---|---|---|---|
| ClassName | String | dk.logiware.SHARKlink.JobStoredProcedure | Job module. |
| Name | String | StockReport | |
| TriggerType | String | RunAt | |
| TriggerValue | String | 01:00 | This will generate the report each night at 1 o’clock. |
| Enabled | Boolean | true | Set to true to enable the task. |
Registry: Scheduler.jobs.StockReport.Parameters
| Registry | Type | Value | Description |
|---|---|---|---|
| StoredProcedure | String | Document_MakeStockCountedReport_OrderID | Name of the stored procedure to execute. |
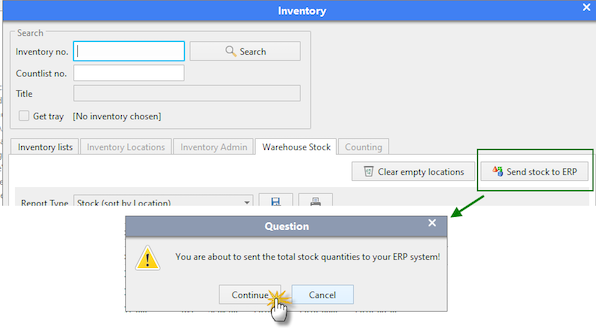
Sending the stock to ERP when required
Set this Registry value to “true” : SharkLink.Export.InventoryFull.InventoryID
Click on button [Send stock to ERP]
XSLT Transformations
XSLT transformations are used to transform between the SHARK XML format and external XML formats.
Customizations
Here are some “code snippets” for XSLT that can be useful to implement transformations.
XML to XML transformations
The normal use of XSLT is for transformation between two different XML formats. SHARK supports both transformation of imported and exported XML files.
Some usefull constructions:
Remove preceding zeroes (here from a SAP material number):
<xsl:if test="string(number(MATNR)) = 'NaN'"><xsl:value-of select="MATNR"/></xsl:if>
XML to ASCII transformation
With XSLT it is also possible to transformXML into flat ASCII files.
This can be a convenient way of making special formatted ASCII files.
Example of an XSL transformation that convert the SHARK XML stock
report to a flat ASCII file.
<?xml version="1.0" encoding="UTF-8"?>
<xsl:stylesheet xmlns:xsl="http://www.w3.org/1999/XSL/Transform" version="1.0">
        <xsl:output method="text"/>
        <xsl:strip-space elements="*"/>
        <xsl:template match="/SHARK-ERP/StockReport">
              <xsl:for-each select="Article">
                      <xsl:call-template name="OneLine"/>
                      <xsl:text> </xsl:text>
              </xsl:for-each>
        </xsl:template>
        <xsl:template name="OneLine">
              <xsl:value-of select="ArticleNumber"/>
              <xsl:text> </xsl:text>
              <xsl:value-of select="Qty"/>
              <xsl:text> </xsl:text>
              <xsl:value-of select="Unit"/>
              <xsl:text> 0.0</xsl:text>
              <xsl:text> 0.0</xsl:text>
              <xsl:text> </xsl:text>
              <xsl:value-of select="LastCountedTime"/>
        </xsl:template>
        <!-- ************************************* -->
        <!-- Default match                         -->
        <!-- ************************************* -->
        <xsl:template match="@*|node()">
              <xsl:apply-templates/>
        </xsl:template>
</xsl:stylesheet>
To generate other encodings than UTF-8, do not specify this in the XSLT file using the tag, instead use the “codepage” parameter for the XML Document Port.
Convenient Examples (code snippets)
XSLT can be difficult to master, here are some examples of code, usefull to solve typical issues.
Fixed length string right justified
<xsl:param name="article" select="Article"></xsl:param>
<xsl:value-of select="substring(concat($article,'                          '), 1, 24)"></xsl:value-of>
Fixed length string left justified
<xsl:param name="qty" select="Qty"></xsl:param>
<xsl:value-of select="substring(concat('00000000',$qty), string-length($qty)+1, 8)"></xsl:value-of>
Change decimal separator
Change the decimal separator ”.” to “,”
Qty is the field to translate
<xsl:value-of select="translate(Qty,'.',',')"/>
Changing thousand separator
Changing thousand separator and/or decimal separator.
First remove thousand separators (.) then, in the result, replace decimal separator (,) with (.)
precondition: thousand separator (if any) must be (.) decimal separator (if any) must be (,)
<xsl:value-of select="translate(Qty,'.',',')"/>
<xsl:template match="/SHARK-ERP/StockReport/Stock/Qty">
  <xsl:variable name="qty" select="."/>
  <xsl:variable name="qtyW_OThousandSeparator" select="translate($qty,'.','')"/>
  <xsl:variable name="qtyWDecimalPoint" select="translate($qtyW_OThousandSeparator,',','.')"/>
  <Qty><xsl:value-of select="$qtyWDecimalPoint"/></Qty>
</xsl:template>
Insert a new line
Insert a new line in text files using platform style new lines.
Create a variable “newline” (with a new line) and refer later to that variable.
This method will use the new line format for the current platform
<xsl:variable name="newline"><xsl:text>
</xsl:text></xsl:variable>
..
..
<xsl:value-of select="$newline" />
Insert a new line in text files using hardcoded new lines.
Carriage return:
New Line:
<xsl:variable name="newline"><xsl:text> </xsl:text></xsl:variable>
..
..
<xsl:value-of select="$newline" />
Can be used to insert all kind of special characters.
Configuration
The XML adapter uses two interface methods for import and export of data.
Import of files is done by one or more jobs running under the SHARK Scheduler.
Export of XML files is done through the DocumentExport job also running under the Scheduler.
Configuration of the XML Exporter
The file exporter is configured from the System Configuration menu (Maintenance -> System Configuration).
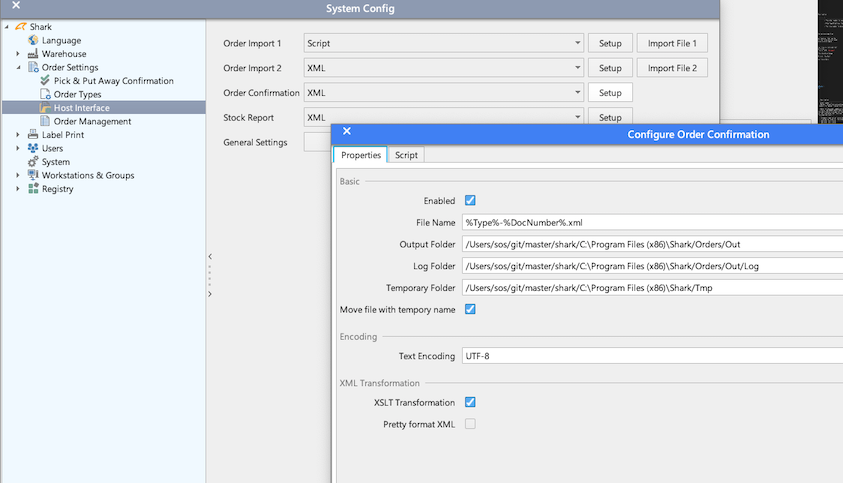
Configure the parameters:
Enabled: Must be selected to make the interface run.
File Name: File pattern for the generated output file, use place holders to define the name (se below).
Output Folder: The folder where the file will be stored. See the section Using FTP to send the file by FTP.
Log Folder: A copy of the generated file will be stored here.
Temporary Folder: Working folders used when transforming and generating the file. To avoid working in an external network drive.
Move file with temporary name: The file is written with an tmp extension and renamed to the final name after created.
Text Encoding: Default is UTF-8.
XSLT Transformation: Activate the transform the generated output using an XSLT transformation (the XSLT is edited on the “Script” tab). This might both generate XML or ASCII output (like csv files).
Pretty Format XML: Nicely format the XML, to make it human readable. Please note this might change the format in an undesirable manner.
Place holders used for the file name:
| Parameter | Description |
|---|---|
| %DocNumber% | Current Document ID. This is a unique running number, that can be used to trace the document. |
| %Type% | Type of document. |
| %Copy% | If the document has been resend, this number will be incremented each time. Is “1” the first time. |
| %Date% | Current date as yyyyMMdd |
| %Time% | Time formatted as HHmmss |
| %Arg1% | Argument 1. A parameter where the content depends on the rest of the configuration. Typical it is the order number. |
| %Arg2% | Optional document parameter. |
| %Arg3% | Optional document parameter. |
Configuration of the XML Importer
The “Importer” is the job that imports the XML files. It is running as a job in the SHARK Scheduler and must be configured to work. The setup will in most cases be handled by the installation and system initialization wizard. But if configured later, it must be done by hand.
The file importer is configured from the System Configuration menu (Maintenance -> System Configuration).
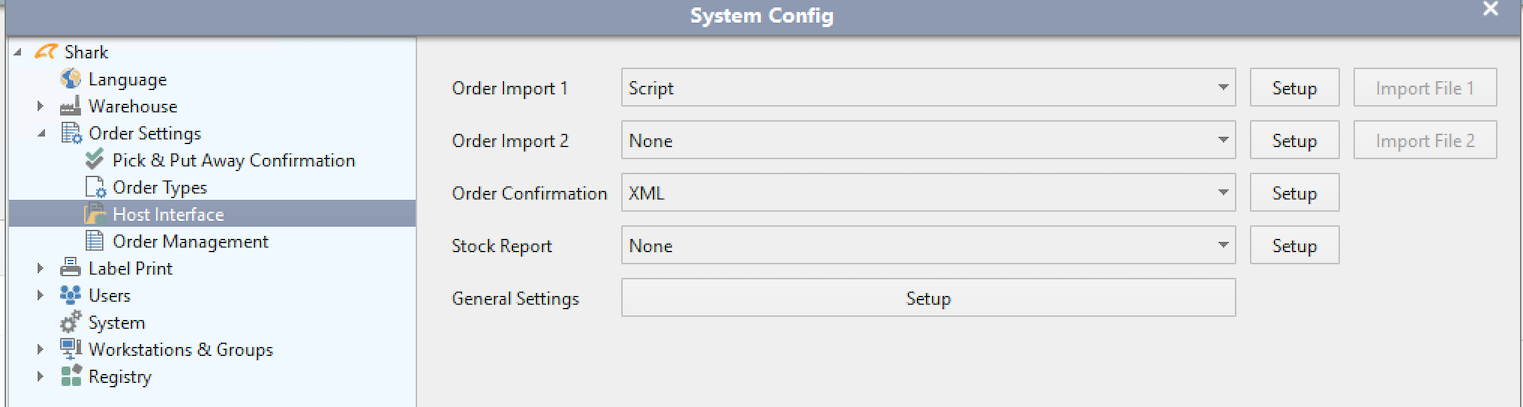
Two importers are available. Normally only one is needed, but due to the fact only one file is imported at a time it might slow the import if files, if a large file is under import. The typical scenario is that large master data files are sent during working hours and they might block for more important pick orders. The solution is to setup two importers, using two different folders, one for large, less important imports and another “fast lane”.
Select “XML” as the import type (other types may be available, but they are not described here).
Press “Setup” to open the configuraton menu.
Now configure the parameters:
Enabled: Must be selected to make the interface run.
Import Folder: This is the folder from where the files are imported. Remember that if the folder is an external folder, it must be a UNC path (do not use mapped drives, they are typical not visible from services). All check the user access rights to the folder, if the importer is running as a Windows service, the user running the service must have access rights to the folder. See the section Using FTP to import from a FTP folder.
Log Folder: When the file is imported successfully, it is moved to this folder.
Error Folder: If the import failed, the file will go here (so this folder should be empty).
Working Folder: If this folder is defined, it will be used as a temporary folder. Network folders can be slow and therefore, the importer can move the file to an internal folder and do the importing from this folder.
File types to import: File extension of files to import.
Delay until import: The importer will first import the file, when it can get write access to the file. Some host systems might open/close the file for each line, this might start an import before the file is finished. A work-around to this is to specify an import delay. When the file is seen by the importer, it will wait the specified number of ms.
Keep Log files in days: The imported files are moved to the log folder and automatically deleted after some days, as specified here. Note that it will not delete in the error folder.
Interval between Imports: Time between the import folder is polled. Minimum time is 5 seconds. Do not set the time lower than required.
Log transformed XML file: If an XSLT transformation is used, this wil also log the output of the transformation.
Strip leading zeros from article numbers: Some Host Systems uses integer numbers as article numbers (SHARK uses strings), this might generate long numbers with zeros in front. Use this option to strip of the zeros. Check this will work with confirmation back to the host.
Strip leading zeros from order numbers: Some Host Systems uses integer numbers as order numbers (SHARK uses strings), this might generate long numbers with zeros in front. Use this option to strip of the zeros. Check first this will work with confirmation back to the host.
XSLT Transformation: Enable this to use an XSLT transformation when importing. The script is edited on the “Script” tab.
Define XSLT Configuration for the XML Importer
First select the “script” tab to open the script editor.
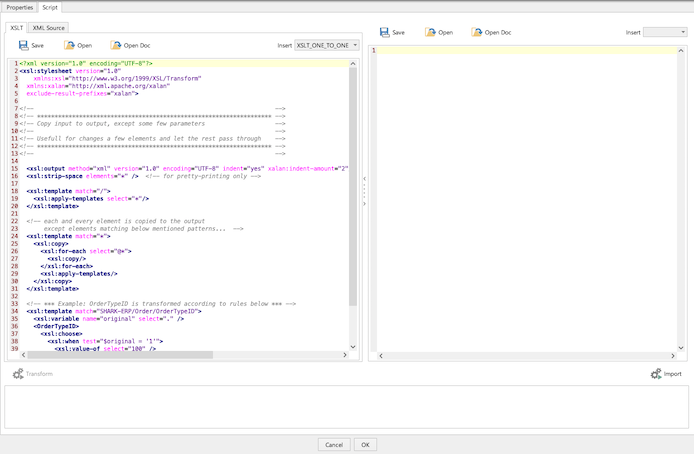
Here you find 2 tabs:
XSLT: This is the XSLT script. There is an “Insert” menu from where code snippets for basic XSLTs can be pasted into the XSLT window.
XML Source: XML test data. Either copy/paste the XML source or import a file.
To the right is a window showing the result from the transformation.
To transform without import, press the “Transform” button.
To import the transformed XML, press the “Import” button.
Right clicking the mouse will show a menu with the following features:
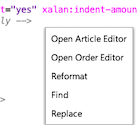
Open Article Editor: Select an article number and choose this, the Article Editor will be opened with this article number.
Open Order Editor: Select an order number and choose this, the Order Editor will be opened with this order number.
Reformat: Uses Tidy to format the XML/XSLT.
Find: Search for text.
Replace: Replace text in file.
Using FTP
The file importer and exporter supports also FTP and secure FTP as file transfer protocols. The login information can’t be set using the normal configuration, but must be configured in the registry.
SHARK must be the FTP client.
The import or export folders must be setup like this:
| Transfer type | Format | Description |
|---|---|---|
| FTP (active mode) | ftp://host/folder | Basic FTP using active mode |
| FTP (passive mode) | ftp://host/folder | Basic FTP using active mode. The registry parameter “.FTP.PassiveMode” must be set “true” |
| SFTP | sftp://host/folder |
Integrating SHARK WMS Cloud and local files
When SHARK is running in the cloud, it has not immediately access to local files. This is handled by installing a local Windows service that has access to a local shared folder structure as well has Internet access. The service will copy the files between the cloud servers and the local file system.
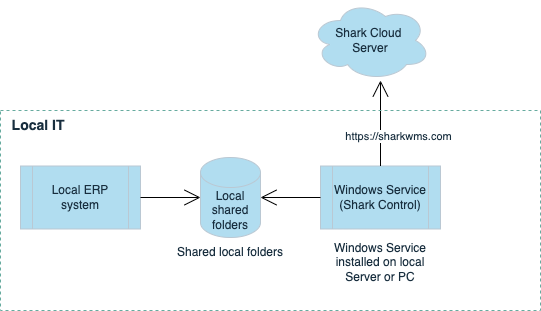
Requirements:
- The service must be installed on a Windows Server or PC.
- The service must be running with an account that has access to the shared folders, used for the integration.
- The service requires Internet access, all communcation will be encrypted (TSL) using port 443.