Goods Reception
Incoming goods for storage must be registered first and then be directed to the right areas of the warehouse. This is a function which can be done without in small warehouses, but if there is more than one zone, it may be convenient to have a goods reception function. In the goods reception the following occurs:
- The article is registered, typically against a purchase order, which the ERP/Host system has sent to SHARK.
- Quantity and quality are controlled.
- The article may be put into a box, stored on a pallet or the like and recorded with a bar code so it is easy to use during the rest of the process.
- For new articles, any product information (master data) not already known will be registered, for example which location type should be used and which zone(s) the article should be stored in.
- If the article can be put away in several zones, it is decided which zones to use. The system will always suggest one, but this may be changed on request.
Put-away is typically more time consuming than picking, and an obvious advantage in using a dedicated goods reception function is that part of the work is in fact moved from the actual warehouse zones, so that put-away can be done as quickly as possible. In particular in vertical lift zones, where put-away can cause a bottle neck, this can be a big advantage.
In the Goods Reception module the items received are registered when a purchase or put-away order already is available. The items are unpacked, counted, and possibly stored in barcode marked boxes.
When an item is received it is also decided when exactly and where it is to be put away. Therefore, one or more Put Transactions are created in the system, one per order line when all items on the order line are heading for the same location, otherwise one transaction for each location.
A SHARK code is assigned to a given transaction. This can either be a box number or a serial number generated by SHARK. The box number can for instance be a barcode on a pallet, a box, or any other place used for transportation of the item. The number can be used to begin the put in the given zone in an easy manner where all you need to do is scan the barcode.
When you have chosen where to put an item, the master data are taken into use. This includes a “refill information” that specifies in which zones the given item can be put.
Configuration of the Item Receipt module is described under:
Navigation
Keyboard hotkey: F7
Menu: Transactions -> Goods Reception
Typically, the module will be used from a PC that is only used for goods reception. Therefore, the goods reception screen is always open and ready for use. However, it is also possible simply to do goods reception directly in a picking zone or from any other PC that has SHARK installed.
Functionality
Nearly all functions can be reached from a window that shows one active order at a time. You can shift between multiple orders if necessary.
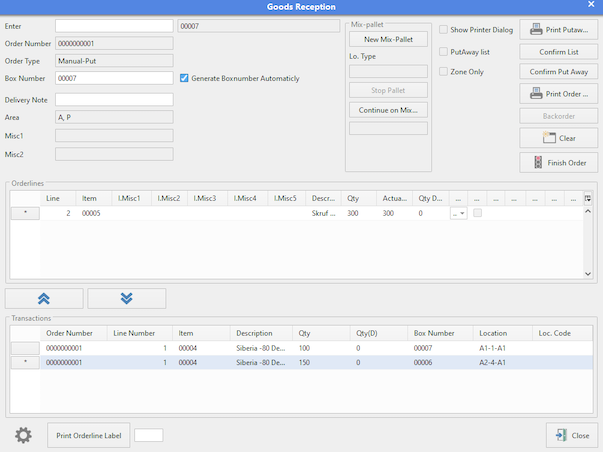
Enter: General typing/barcode scanning field. When a box number barcode is scanned the active box number will be updated. When an order number is scanned the active order number will change. When an article number is scanned, all the purchase orders in which the given order figures are shown. From here, relevant purchase orders can be chosen and thus, it is not necessary to know the order number.
Order Number: The active order number.
Order Type: The type of the active order.
box number: The active box number.
Delivery Note: Option to add a delivery note number.
Generate box number Automatically: If you do not use boxes, this field must be ticked - SHARK will then automatically assign a box serial number.
Orderlines: Order lines in the active order that have not yet been registered. If you double-click an order line, Transactions are created for the Line and it is moved down into the Transactions window below. Choose the first desired zone in the column ”Zone”, as and if appropriate (only zones where the item is defined are shown)
This is the default columns visible, the actually displayed information can be configured.
- Line: Line number either from the Host System or an automatically generated number.
- Item: Article Number.
- Description: Article description.
- Qty: This is quantity requested by the order.
- Actual Qty: This is the remaining quantity to received.
- Qty Delivered: The quantity already received, including what is put on stock and what is received, but not yet on stock.
- Zone: The preferred zone where the articles can be stored if it is possible.
- Back Order: Selected if there is one or more pick-orders waiting for this article.
Transactions: Here you find order lines that are registered and are ready be stored for the active order.
Aside from specification of article and number, you will find the box number and the location at which the item will be put. The following information will appear:
- Order Number
- Line Number
- Item
- Description of the item
- Qty: The quantity for for this transaction. The quantity can be changed in case the actual quantity is smaller og bigger
- Quantity (L): Total Quantity Delivered. Meaning the quantity that is already put on the order. Relevant for orders in progress
- Box Number: The number of the box in which the item is registered
- Location: The location at which the item will be put
If you wish to recall a single transaction, typically in order to change the data and find a new location, you can double-click the transaction to move it up as a pending Orderline.
[PRINT]: Print a label that can follow the item. A label format must be defined and naturally, a printer must be connected for the function to work.
[CLEAR]: Restart on a new order. Deletes the data entered in all fields.
[REMAINDER]: Gives access to picking orders that await the item that is being put away. This function allows you to save an actual put for an awaiting order that takes both time and labour when the entire lot is to be picked anyway.
[Cursor key up]: Recall all transactions.
[Cursor key down]: **Create transactions for all orderlines.
[Close]: Close window.
Reception of articles using boxes
Procedure for reception of articles that are to be put away using a box.
- Unpack the items.
- Scan the barcode on the box in which the item(s) is/are to be put.
Type order number or find the order via an article number. If there are multiple possible orders, choose from the menu shown below. View all awaiting purchase orders by typing new line into an empty field.
The Orderlines for the selected order are now displayed. Now, choose which line is to be received. Do this by:
- Double-clicking the line for the item that is to be put in the selected box.
- Typing/scanning item number, EAN code, or alternatively item number.
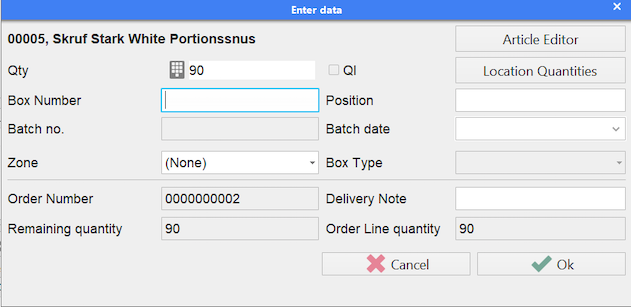
The line will now “jump” down to the transaction list showing where the item is to be placed. It is then possible to change the quantity of received items in case the delivery in question consists of multiple parts. Edit the content of the field “Quantity” and press “enter” to confirm. At this point, a new Order line will be created with the missing number. This can later be used for reception of the remaining items.
Keep choosing lines if you wish to put more lines in the same box.
Switch box by taking a new empty box and scan its barcode.
How to
Receiving articles without a fixed box numbers
See ”Reception of items with box”. Note that “Generate box number automatically” must be ticked, allowing for SHARK to generate a box serial number that can be printed as a barcode on a label. The box serial number can be entered, using a barcode scanner, on the Floating batch pick screen, if so desired.
Articles without defined master data
When receiving articles that have never before been stored, basic information about placement of the given article in the stock is needed. In these cases SHARK will show a dialog, prompting you to type in the basic information:
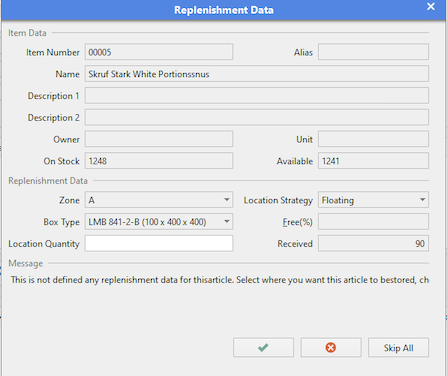
Here, you can choose the zone and the type of location, at which you wish the item to be stored. You can also state how much space is available at the desired location type. If no value is stated, a very high one will automatically be registered.
Changing of Master Data for the article
It will in many instances be expedient to change the master data of a specific article, while stowing it away, as this is the first point at which you encounter the item in a put-away situation and therefore also the point at which you can decide where and how it should be stowed. Therefore, a shortcut has been provided, that leads to the Master Data in the Article Editor. This can be found by right-clicking with the mouse on the order line, at which point you can choose to open the Article Editor or go directly to the Location Quantity screen, which defines the maximum quantity of the article in question, which will fit onto a given location type.
Cross-docking
Cross docking means moving the goods directly from goods reception to shipment. It means reduced handling of the material and no storage requirement. Two types of goods reception exists:
- The purchase order (inbound) is directly linked to the sales order (outbound). In this case cross docking is a requirement. It typical happens when the goods are not on stock.
- There are sales orders with a back order status waiting for the incoming goods. There are no rules, who should have the material first.
In the event that an order is awaiting the article in question it is marked on the Order line in the field ”Remainder” and the button “Remainder” appears. It is then possible to pick directly in accordance with the order, by pressing the button [Remainder]. In this way you save a picking and possibly a put, all the while performing the operation faster.
Use of Picking Lists
It is possible to print putting lists in the Goods Reception screen, if lists in paper format are used. The list follows the articles and is afterwards to be given a receipt, in order to have the put performed.
Printing of Labels
It is possible to print a label, either for each order line or for the
ent
Label configuration found under system configuration. The two relevant formats are: ”Goods Reception Order” and ”Goods Reception Orderline”.
Goods reception of mixed pallets
On the Goods Reception screen it is possible to receive a mixed pallet. The controls for this purpose is located in the Mixed Pallet panel.
Using this feature, all transactions will target one and the same location, which must be an empty location, configured as a multi-location.
In the course of the reception of the mixed pallet, you will be prompted for a location type to be used for the stow-away of the mixed pallet. Be sure to choose a location type of which at least one empty multi-location exists.
When all order lines have been processed into transactions, the Goods Reception screen will show the transactions like this. Note that the same location is to be used for all the transactions.
Quality Inspection
Sometimes it is required to inspect the quality of received goods, before they are released for picking. It is possible in SHARK to mark an inbound order line with a quality inspection flag (QI) to inform the warehouse, that inspection is needed for this specific purchase.
When receiving with the QI flag, the received goods will be stored in a “locked location”, which means it cannot be released for normal picking. The location can be anywhere in the warehouse, but typical it is convenient to have a separate area (zone), to be used for items that requires inspection.
To release the items from inspection, it can either be moved to a final location. The QI flag will not follow the item when moved, or the flag on the location can be removed (for example by the Article Editor).
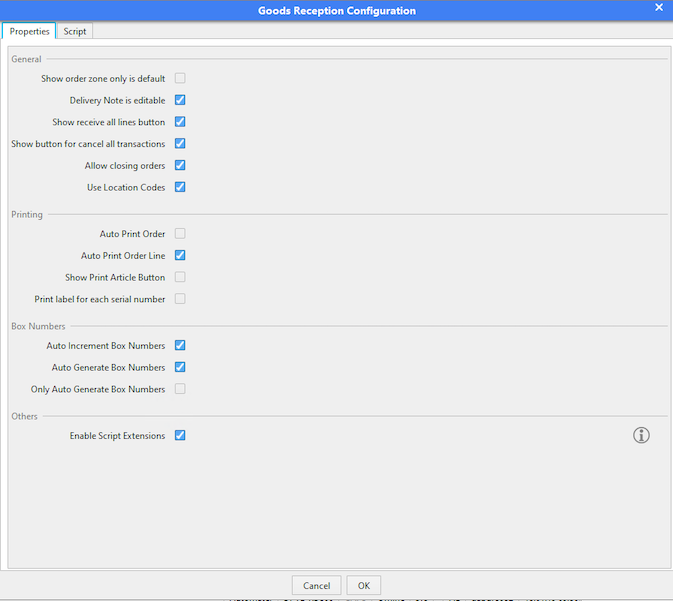
Configuration
Th Goods Reception can be configured in different ways.
General Configuration
The Goods Reception window can be configured in different ways using the configuration menu.
Changing the displayed columns
What information is required to be visible various among users. The displayed columns can be selected by clicking the upper right corner of the table.

Interpretation of GS1 Barcodes
There is a configuration parameter called “Interpret GS1”, if that is activate the enter field will interpret the input as a GS1 barcode if possible. Only a limited number of codes are supported:
| Data Type | GS1 code | Notes |
|---|---|---|
| GTIN | 01 | |
| Batch Number | 10 | |
| Expiration Date | 17 |